Friday, February 15, 2013

SENFBROT - GERMAN MUSTARD BREAD


For an updated version of this post CLICK HERE


Facebook friend and co-baker David Wolfe asked me to help him understand some terms in a German recipe.

Google translate (always good for a laugh!) is not too fluent in professional German baking lingo.

The formula, published by a German bakers' association, Bäko Gruppe Nord, seemed quite intriguing, combining rye meal and cracked wheat with mustard and cheese. The amounts, of course, were calculated for a commercial bakery (43 lb), as were the instructions.

My curiosity was wakened, especially after I saw David's appetizing photos in his blog (check it out!) "Hearth Baked Tunes" so I downsized the formula for two small loaves.

The original recipe requires 16% of the white flour as preferment, all the remaining flour, including the coarse grinds, is worked into the final dough. The breads are baked "bei Brötchentemperatur" ("at roll temperature") - leaving hapless hobby bakers clueless as to what that might be.

But I don't donate for nothing to Wikipedia, a quick research at the German site showed me the light: the breads were to be baked at 465ºF/240ºC.

Since I'm a friend of long fermentation (also from a physician's point of view,) I re-wrote the procedure from using just a small amount of preferment,  to preferment plus soaker for the coarse ground rye and wheat, as well as an overnight fermentation of the dough.

I can honestly say I never noticed a difference between adding the salt with all the other ingredients, or adding it later to the almost finished dough. Peter Reinhart (my guru) mixes everything together at the same time, and I do, too.

For the cheese you can choose between Gouda or Tilsiter. I don't care for stinky cheeses, so I went for the Dutch. Though the recipe didn't specify what kind, it was clear that I would use middle aged cheese (18-month), as I would for gratins, young Gouda is too mild, and really old Gouda unnecessary expensive.

I was very pleased with the result, a beautiful red golden bread, covered with seeds, with a pleasant spiciness, but not too much. It tasted great with cold cuts, and was a wonderful surprise when toasted: a bread with in-built grilled cheese!

Mustard (from Düsseldorf) and coarsely grated Gouda

 SENFBROT - MUSTARD BREAD  (2 small loaves)

Preferment
140 g/5 oz bread flour
  84 g/3 oz water
    1 g/ 1/4 tsp. instant yeast
    2 g/0.12 oz salt

Soaker
104 g/3.7 oz wheat meal, coarse
  70 g/2.5 oz rye meal
130 g/4.4 oz water
    3 g/0.12 oz salt

Final Dough
all preferment
all soaker
556 g/19.6 oz bread flour
  15 g/0.5 oz instant yeast
  16 g/0.6 oz salt
408 g/14.3 oz water
  66 g/2.3 oz mustard
122 g/4.3 oz middle aged Gouda (18 month old), coarsely grated or cut in chunks

mustard for brushing
sunflower or pumpkin seed for topping (I used pumpkin seed)

DAY 1:
In the morning, mix preferment and soaker. Cover bowls, and leave them at room temperature.

In the evening, mix all final dough ingredients at low speed (or by hand) for 1 - 2 minutes, until all flour is hydrated. Let rest for 5 minutes, then knead at medium-low speed (or by hand) for 6 minutes, adjusting with a little more water or flour, if necessary (dough should be somewhat sticky, clearing only sides of bowl, but stick to bottom.)

Transfer dough to a lightly oiled work surface. With oiled hands, stretch and pat it into a square, first fold top and bottom in thirds, like a business letter, then do the same from both sides.

Gather dough into a ball, place seam side down into a lightly oiled bowl, cover, and let it rest for 10 minutes.

Repeat this stretching and folding 3 times, with 10 minute intervals. After last fold, place dough in lightly oiled container with lid and refrigerate overnight. (I divide the dough at this point in halves, and refrigerate it in two containers.)

First the breads are brushed with mustard....

DAY 2:
Remove dough from fridge 2 hours before using.

Preheat oven to 465ºF/240ºC, including baking stone and steam pan. Place seeds for topping on a plate.

.... then rolled in pumpkin or sunflower seeds
Shape dough into 2 boules, brush them with mustard, and then roll them in sunflower or pumpkin seeds.

Place breads, seam side down, on parchment lined baking sheet, and let them proof, until they have grown 1 1/2 times their original size.

Bake for 15 minutes, steaming with 1 cup of boiling water. Remove steam pan, and rotate breads 180 degrees.

Reduce temperature to 210ºC/410ºF,  and continue baking for another 25 minutes, or until breads are a deep reddish brown, sound hollow when thumped at the bottom, and register at least 200ºF/93ºC.

Let breads cool on a wire rack.

The crumb has a nice yellow color from the mustard

Submitted to YeastSpotting

Monday, February 4, 2013

BOSTON CREAM PIE - IT'S A CAKE!

Hier geht's zur deutschen Version dieses Post


January is finally over - it was no friend of the Anderson family, nor of their car! But we survived the untimely end of our vehicle, and even our colorful bruises are by now almost history.

Fortunately we survived the collision - our car did not!
Time for a brand new month, a brand new car - and a brand new Avid Baker's Challenge!

This year we use King Arthur Flour recipes as inspiration, and, with January's "Panettone Muffins", we were off for a roaring start.

"Boston Cream Pie" is a classic. In 1856, Monsieur Sanzian, French chef of the Parker House Hotel in Boston, turned ye olde custard filled "Pudding Cake Pie" into an elegant dessert by adding a layer of chocolate icing.

He also dressed the sides with almond slivers, but King Arthur's and other versions do not.

This so called pie is no pie at all, but a sponge cake, filled with a layer of pastry cream, and topped with chocolate ganache. Eggy and rich as it is, it doesn't keep very long and should be eaten within two or three days (at the most.)

Having only one co-eater at home, I decided to make a smaller version with half of the Boston Cream Pie recipe, using a 7" springform pan. I also used King Arthur's highly recommended Pastry Cream (1/4 recipe.)

King Arthur apparently has a pronounced sweet tooth. The amount of sugar in the cake seems very high - I reduced it by half, and it was still quite sweet.

The original recipe suggests rubbing a piece of butter over the surface of the hot pastry cream before covering it with plastic wrap, to prevent sticking. I buttered the plastic wrap - much easier than messing around with the cream.

The smaller cake took only 40 minutes to develop a deep golden brown. The original recipe says the cake should be "beginning to pull away from the sides of the pan", but mine and other bloggers' didn't - so don't wait for that to happen, otherwise your cake will be over-baked and dry!

Massachussetts' State Dessert in all its glory!

BOSTON CREAM PIE  (for a 7" cake)

CAKE
1 ½ eggs, at room temperature
150 g (3/4 cup) sugar
½ tsp vanilla extract
85 g (3/8 cup) milk
7 g (1/2 tbsp) butter
85 g (3/4 cup) unbleached cake flour
¾ tsp. baking powder
¼ tsp. salt

PASTRY CREAM  (can be made up to 3 days ahead and stored in the fridge)
170 g (3/4 cup) whole milk
25 g (1/8 cup) sugar
1 pinch salt
½ tsp vanilla extract (or 1/8 vanilla bean)
9 g (1 tbsp.) corn starch
¾ tsp all-purpose flour
1 egg yolk
14 g (1 tbsp.) butter

GLAZE
57 g (1/4 cup) heavy or whipping cream
1 ½ tsp corn syrup
64 g (3/8 cup) chopped dark chocolate or semisweet chocolate chips
¼ tsp. vanilla extract


PASTRY CREAM:
In medium saucepan, stir together 1/2 + 1/8 cups of the milk, sugar, salt, and vanilla bean. (If using vanilla extract, add it at the end.) Bring to a simmer over medium heat, stirring to dissolve the sugar.

Meanwhile, whisk cornstarch, flour, and egg yolk with remaining 1/8 cup milk. Whisk some of the hot milk mixture with egg yolk to temper them. Then pour egg/milk mixture back into remaining simmering milk. (Doing this through a strainer will help prevent lumps.) 


Whisk constantly until mixture thickens
Bring mixture to a boil, whisking constantly, until it thickens. Remove from heat and strain through a fine sieve. Stir in butter and vanilla extract (if using).

Grease piece of plastic wrap and place over pastry cream (so that it touches surface of cream to prevent skin from forming.) Refrigerate until cool.


CAKE:
Preheat oven to 350°F. Grease 7" springform pan, line with parchment, and grease parchment.

Beat eggs and sugar until very thick, until batter falls from paddle in thick ribbons. Beat in vanilla.

Bring milk and butter to a simmer in small saucepan. Slowly stream it into egg/sugar mixture with engine running, and beat for another minute.

Mix dry ingredients into wet ingredients until just combined

Sift flour, baking powder, and salt over cake batter. Mix on low speed just until combined, about 1 minute.

Pour batter into cake pan, checking carefully for lumps of flour. (Remove any lumps.)

Bake cake for about 40 minutes, or until it's a deep golden brown (it's supposed to begin to pull away from sides of pan, mine didn't, so don't wait for it!)

Run a spatula or table knife around cake edges (if using a springform pan, remove rim,) and let cool in pan for 10 minutes. Turn cake out onto rack to cool completely.

Using a long serrated knife, cut cake horizontally into two equal layers. Fill with pastry cream, spreading it right to the edges. Replace the top layer.

Waiting for the chocolate glaze

GLAZE:
Melt chocolate, corn syrup, and cream together until smooth and free of lumps. Add vanilla and stir well.

Pour glaze over filled cake.

(Store any leftovers in the fridge, wrapped in plastic.)

In the meantime, we have visited the Parker House Hotel in Boston, and, of course, ordered the famous dessert. The Boston Cream Pie tasted as good, as we had hoped, and this is what it looked like, en miniature, and a little spruced up:

Boston Cream Pie at the Omni Parker House Hotel in Boston

Post updated 12/28/15

Wednesday, January 23, 2013

COOKING WITH MY MOM - BRUSSELS SPROUTS SOUFFLÉ AND KEY LIME BARS


Brussels sprout soufflé fresh from the oven
Hier geht's zur deutschen Version dieses Posts 


My mother is an amazing woman. A retired gynecologist at 93, she is still going strong, grocery shopping with her bike, climbing up the stairs to her third floor apartment, staying on top of the news, and struggling to keep up with the pile of medical magazines on her table (I inherited those qualms to throw out unread newspapers - you never know what you might miss!)

Three years ago she also learned to use a computer in order to join Facebook. She didn't want to be the only family member not able to see the photos my daughter posted from her stay in Bhutan, my sister's from her garden on Mallorca, or pictures of my newest kitchen ventures.

When I visited my mother last fall in Hamburg I wanted to cook something with her, something light, healthy and, of course, delicious.

My Mom's no-frills kitchen
Kitchens resemble owners - Mutti's kitchen is a spacious, cheerful place, a cooking/dining room with a no nonsense, no frills, and waste-not-want-not attitude.

The tall cabinet - painted in neon pink, yellow and blue by my 14-year old sister 50 years ago, when my mother was not looking - holds an abundance of supplies, kitchen gadgets, and odds and ends.

Many of those were left behind whenever my sister and I were moving ("You never know when somebody might need them," Mutti insists), but the strangest item is an enameled colander - made from a recycled WWII helmet, with holes for the strap!

Helmet turned colander

Baking there is a bit of a challenge, because the oven also serves as storage space for pots and pans, that have to find another place in a kitchen full of flower pots, newspaper clippings, and other things my mother likes to have around.

But I am a baker, and where there is a will, there is a way. So one morning we went shopping and purchased Brussels sprouts, limes, graham cookies and sweetened condensed milk (not an easy thing to find in German supermarkets).

Mutti purées Brussels sprouts
Brussels sprouts are the base for a wonderful soufflé that will turn even Brussels sprouts haters into fans. It can be also made with broccoli or cauliflower.


BRUSSELS SPROUTS SOUFFLÉ
(3-4 servings)
(adapted from Johanna Handschmann: "Aufläufe aus der Vollwertküche")

300 g Brussels sprouts (or broccoli or cauliflower)
 40 g butter
 40 g whole wheat flour
250 ml heavy cream or milk
1/2 cube vegetable broth (or 1 tsp. broth granules)
pepper, freshly grated, to taste
pinch nutmeg, freshly grated, to taste
herbal salt, to taste
50 g Emmental cheese, coarsely grated
3 - 4 eggs, separated
butter, for gratin form


Cut large Brussels sprouts in halves, broccoli or cauliflower in florets. Cook in steamer for ca. 5 - 7 minutes until almost done. (Or cook with 1 cup water and 1 tsp. lemon juice in pan with tightly fitting lid.) Drain and set aside.

For the Béchamel sauce, cook butter in a large sauce pan until foaming. Add flour and cook over medium heat for 1 - 2 minutes, stirring frequently, until slightly browned. Remove from heat, and whisk in cream or milk in a slow stream. Add herbal salt and spices, then bring to a simmer, stirring constantly, until mixture has thickened. Set aside.

Béchamel sauce

Preheat oven to 400º F/200º C. Adjust rack to middle rung. Place high rimmed gratin form in oven for 5 minutes, to warm up.  

Using a food processor, immersion blender or chef's knife, finely chop Brussels sprouts (or broccoli or cauliflower).

Stir purée into butter/cream mixture. Add cheese and egg yolks and mix until well blended. Season with herbal salt, pepper and nutmeg to taste.

Remove hot gratin form from oven, and melt a piece of butter, tilting pan to grease bottom.

Whisk egg whites with pinch of salt until stiff. Fold into vegetable mixture. Pour into gratin form, smooth top with rubber spatula, and immediately place into oven.

Bake gratin for 20 - 25 minutes, or until top is well browned. Let cool for 5 minutes in switched-off oven with door slightly ajar, then serve immediately.

Waiting for her daughter...

My mother loves desserts - she often says with conviction: "The dessert is always the best part of a meal!" We both prefer tart fruits, and don't like it overly sweet. Therefore I chose a citrus-y dessert that is as delicious as it is simple:


KEY LIME BARS  (16 servings)  (adapted from "Cook's Illustrated")

Crust
142 g/5 oz animal crackers or other dry cookies
1 tbsp. brown sugar
1 pinch salt
57 g/4 tbsp butter, melted

Filling
57 g/2 oz cream cheese
1 tbsp. lime zest (1 lime)
1 pinch salt
1 can sweetened condensed milk (399 g/14 oz)
1 egg yolk
½ cup lime juice ( 1-1/2 limes)
lime zest , for garnish

Preheat oven to 325ºF/160ºC. Line an 8 x 8" (20 x 20 cm) square pan crosswise with aluminum foil strips, allowing extra foil to hang over edges of pan. Mist with oil spray.

For the crust, process crackers in food processor until finely ground (or place cookies in ZipLock bag and crush them with roller pin), add brown sugar and salt, and pulse to combine.

Drizzle with melted butter, and pulse until all crumbs are moistened. Press crumbs evenly into bottom of pan.

Bake crust until deep golden brown, 18 - 20 minutes. Let cool on wire rack (don't turn off the oven!)

For the filling, combine cream cheese, lime zest and salt in mixing bowl. Add sweetened condensed milk, and mix until well blended. Whisk in egg yolk. Add lime juice, and mix gently until incorporated.

Pour filling in cooled crust, and smooth top with spatula. Bake until set, and edges begin to pull away slightly from sides (15 - 20 minutes.)

Transfer pan to wire rack, and let cake cool to room temperature. Decorate with lime zest. Cover pan with foil and refrigerate until thoroughly chilled, at least 2 hours.

Remove cake from pan by lifting foil extensions. Cut into 16 squares.

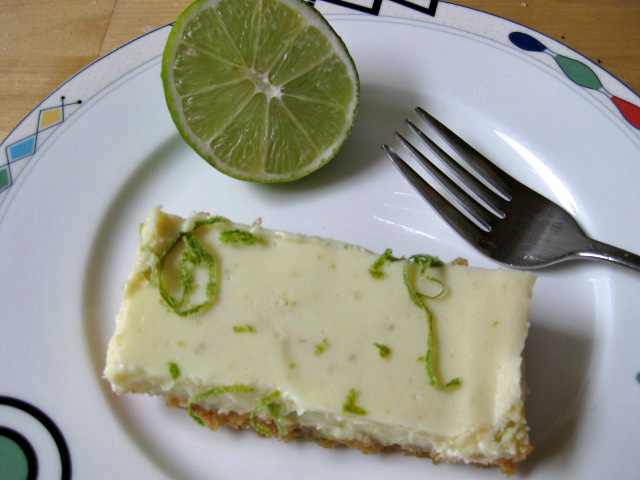
Key Lime Bars


I could never find fresh Key limes, when I baked these, but you can as well use regular (Persian) limes. But don't substitute with bottled lime juice - the bars will not taste the same!

Since the sweetened condensed milk supplies plenty of sugar, I cut down on the sugar when making the crust (from 3 tablespoons to 1 tablespoon.)

"Cook's Illustrated" suggests toasted shredded coconut as garnish for those who don't like it too tart. Mutti and I, of course, love citrus flavor and used lime zest curls as decoration.

The Key Lime Bars keep fresh for several days if stored in the refrigerator - if they last that long!

My mother Gisela, my older sister Ingrid, and me in the Fifties


Saturday, January 5, 2013

PANETTONE'S LITTLE COUSINS - PANETTONE MUFFINS

A sprinkling with sparkling sugar adds a nice crunch

Hier geht's zur deutschen Version dieses Posts


 A hopefully happier New Year (no broken foot, no deer in the car, and no campaign ads!) has begun  - and with it a brand new Avid Baker's Challenge. In 2013 we will throw out combined baking efforts at King Arthur recipes, published on their website.

As a professional bread baker, I use a lot of King Arthur Flours, but in this recipe were some unknown ingredients that made me wonder whether I should spend the extra money, or make do with substitutes.

Our January challenge, Panettone Muffins, requires "Fiori di Sicilia" - Flowers of Sicily, a citrus vanilla essence that is, according to King Arthur, traditionally used to flavor panettone.

After an inner struggle with my thrifty super ego I ordered it - who am I to spurn a time honored Italian tradition! (It better be good - for that price!)

The Cake Enhancer, listed as an optional ingredient, was another matter - no way I would use an additive that wasn't a matter of life or death. And besides - enhancers are for wimps! I dare any cake or bread not to give its best when I bake it.

Apricots, pineapples, prunes, cherries and raisins soaking in a rum-orange mix


For the dried fruit mixture I chose mostly tangy fruits, like pineapple, prunes, tart cherries, apricots and golden raisins. I didn't have quite enough rum to soak them, so I topped it off with orange juice, using the microwave for a flash soaking.

Adding dry ingredients alternating with milk to the butter mixture

Preparing the batter was fast and easy. I changed two things: we don't like it too sweet, so I reduced the sugar. And I exchanged some of the white flour with whole wheat pastry (my favorite flavor enhancer - and anti-staling agent.)

Folding in the soaked fruit


The batter was sufficient to fill the twelve muffin cups almost to the top. A sprinkling of coarse sparking sugar added a nice crunchy topping.

Fresh from the oven

After 18 minutes the muffins were done. They were still rather pale on top, so don't wait for them to turn golden brown - if you do, they will be dry.

The best of all husbands could hardly wait until the muffins were out of the pan, no wonder, they looked really nice and smelled so good. The rum-orange soaked fruit pieces could have been a little more (I was cautious and used only the smaller amount). The muffins had a very delicate citrus flavor from the 1/4 teaspoon of Fiori di Sicilia.

A day later, the muffins tasted even better. And we noticed that they were moister - overnight the liquid from the fruit had permeated the crumb. There was no noticeable alcohol taste, next time I would be probably bolder and make an all-rum soaker.

Here is King Arthur's Panettone Muffin recipe - you can switch between volume, ounces, and metric measures. A very handy tool!

My recommendations:
  1. Use the full 9 ounces/255 g of fruits.
  2. Reduce the sugar by a quarter or a third - the fruit and sugar topping are sweet, too.
  3. Exchange a quarter of the all-purpose with whole wheat pastry or white whole wheat flour.
  4. Don't wait for the muffin tops to get a golden color on top - they might get over-baked and dry. 
  5. DO WAIT a day before eating them, your muffin will be more flavorful and moister. 

Like their big cousin, the Pannetone Muffins taste better after resting for a day
We Avid Bakers don't bite and welcome company! So, if you'd like to bake along, here is the link to Hanaâ's blog.


Thursday, January 3, 2013

DAN LEPARD'S STILTON CRUST SAUSAGE ROLLS


Hier geht's zur deutschen Version dieses Posts (folgt noch)


Dan Lepard, master baker from England ("The Art of Handmade Bread"), travels (and bakes) all over the world. He also contributes regularly to the weekend issue of the "Guardian", and is always good for an interesting recipe.

I tried several of them, and never had a bad experience. Whether marmalade, pancakes, pasties, cakes or his "boozy" Ale House Rolls, we liked them all. When I saw his recipe for Stilton Crust Sausage Rolls, I was intrigued by the idea to spruce up simple store-bought puff pastry with layers of blue cheese.

There was still some puff pastry in the freezer, and I overcame my inner Scrooge to purchase real, imported Stilton.

Stilton crumbles easily, just use your fingers

Preparing the crust was easy. I crumbled the Stilton evenly over one sheet of thawed puff pastry, placed the second sheet on top, pressed it down with my hands to adhere, and then rolled it out to two times its original size.

It looks like a lot of blue cheese, but it is just right and not too strong!

The package is then folded, re-rolled, and folded again, creating several layers of cheese within the pastry. After these turns it needs a nap in the refrigerator for at least half an hour.

While the dough was resting, I prepared the sausage filling. An opened package with Johnsonville's "Stadium Brats" - the only American bratwurst that tastes like a German one - was my sausage choice, and, instead of the ground pork the recipe suggests, I took 80% lean ground beef (another leftover in the fridge.)

The idea of a fennel seasoning didn't appeal to me too much. Though I like fennel, and use it regularly in my breads, I do not care for the pervasive anise-y flavor of American Italian sausages (something never heard of in Italy, as my half Italian husband assures me.)

Bratwurst, ground beef, marjoram and white bread crumbs for the filling

With the German type bratwurst a marjoram seasoning instead of the fennel seemed the obvious choice (I used only 1/2 teaspoon.) "Stadium Brats" don't have casings that need removing, and my food processor made mixing a cinch. (I recommend chilling the filling until using.)

A few pulses and the filling is done


The next step was arranging the filling on the chilled pastry. I wasn't quite sure what size of rolls I would end up with - you have to consider that before you roll out the dough - but mathematical imagination is not my forte, and my rolls turned out a bit larger than Dan Lepard's. 

Arranging the filling. The blue Stilton is visible through the puff pastry

I placed the filling on the lower half of the pastry, leaving a free edge for the seam. The upper half is then folded over, and crimped with a fork. To create a neat edge, I used a pizza roller to cut off the excess dough.

Stilton crust loaf with crimped seams

Since I wanted to freeze some of the rolls, I did not apply egg wash over the whole loaf, but cut it first into slices. My loaf yielded 10 slices/rolls (about 1 1/2 inch wide.)

Applying egg wash and scoring

After brushing the rolls with the beaten egg, I slashed them with a sharp knife, parallel to the cut sides.

The sausage rolls baked for 25 minutes, at 400ºF/200ºC, to be golden brown and sizzling. I realized, though, that a lot of fat was rendered from the filling during the bake, leaving the bottom of the rolls soft. Next time I would elevate the rolls with a rack on top of the baking sheet.

We had the Stilton Crust Sausage Rolls for dinner, and LOVED them! The blue cheese in the crust added a pleasant spiciness, and the seasoning of the sausages, plus the marjoram, was sufficient to flavor the whole filling - no extra salt or pepper is needed.

Dan Lepard's recipe in the "Guardian" you can find here.

TO MAKE AHEAD: The cheese pastry and the filling, or the filled loaf (without egg wash), can be kept in the refrigerator for at least a day.

The shaped rolls (without egg wash!) can be easily frozen, individually wrapped in plastic, and placed in a container with lid. They don't need to be thawed, but before baking, brush them with beaten egg, and slash the top with a sharp knife. The baking time will be a bit longer for frozen rolls.

We loved the spicy sausage rolls!

Wednesday, November 21, 2012

BEER RYE BREAD - FOR CYCLISTS AND OTHERS

Hier geht's zur deutschen Version dieses Posts


Long time no see - after I baked four breads from my Equal Opportunity Baking list that I wasn't 100% satisfied with, I got a bit burned out on them. The anal Virgo in me didn't want to continue with yet another Fair Baking Bread without having tried to coax and tweak the grade C candidates to a better performance or more satisfying taste.

Slowly I revisited and rebaked (I learned to use the prefix "re" from the creators of our daily crossword puzzle - it is amazing how you can put a "re" in front of any given verb and come up with a new term never heard of before!) the soso breads, Arkatena Bread, Muesli Rolls (both fine now), Camembert Grape Bread, and then the Beer Rye.

I had picked Bill Middeke's contribution to Kim Ode's "Baking with the St. Paul Bread Club" because of the combination stout and rye. In my opinion nothing made with beer can be bad (unless, perhaps, it's made with Bud Light, aka dish wash water, or other beer abominations).


The amount of sweeteners, molasses and brown sugar (both 1/4 cup for two small loaves), seemed a lot, so I reduced them by half, to 1/8 cup each.

The recipe, originally posted in the "St. Louis Globe-Democrat", had called for lard or bacon fat instead of the shortening listed in Kim Ode's book.

As a German accustomed to cooking with lard, and no friend of shortening, I switched back to the original piggy fat.

For the active dry yeast I used instant, my default, and, also worked with the stretch & fold method, plus overnight cold fermentation, instead of making, and baking, the breads on the same day.

Everything worked well, only the baking time was a bit longer. The bread looked really pretty, but even with the reduced amounts of sugar and molasses it was still way too sweet for my taste!

Bill Middeke, an ardent bicyclist, surely needs sufficient carbohydrates to fuel him for his athletic rides, but my bike carries me mostly to the nearby supermarket, and I get plenty of extra carbs from chocolate and desserts.

Not only that, the best of all husbands complained about the caraway. While I like it, Richard doesn't care for the taste and always finds it overdosed.

So I had another go at the Beer Rye Bread, this time cutting sugar and molasses again by 50%, adding a little more water, to make up for the molasses reduction, and using only 1 teaspoon caraway instead of 1 tablespoon.

We were eager to try the new bread - the sweetness was just right, but with less sugar the bread was a bit bland, and could do with more salt. And my spouse, known to be a delicate little flower, found himself OD'd on caraway again....

Relentlessly adapted to the Andersons' preferences, this final version received the stamp of approval: a tasty bread, slightly sweet, with a hint of caraway, and full of the good stuff: black Ruthless Rye.
  
"Ruthless" Rye Bread

 BEER RYE BREAD
 (2 small breads)

1 ½ cups stout, or other dark ale (350 g)
70 g water
34 g lard (or shortening)
9 g light brown sugar
21 g molasses
12 g salt
1 tbsp. orange zest, (ca. 8 g)
1/2 tsp. caraway seeds, (or more, to taste)
3 g instant yeast
325 g rye flour
320 g all-purpose flour
rolled rye, for topping

DAY 1:
In saucepan, heat beer and water until just starting to bubble. Add lard, sugar, molasses, salt, orange zest, and caraway seeds. Let cool to lukewarm (not more than 95 F.)

Stir yeast into beer mixture, until dissolved. Pour in mixer bowl, and add flour. Mix at low speed (or by hand) for 1 - 2 minutes, until all flour is hydrated. Let rest for 5 minutes, then knead at medium-low speed (or by hand) for 6 minutes, adjusting with more water or flour, if necessary (dough should be soft and still somewhat sticky.)

Transfer dough to lightly oiled work surface. With oiled hands, stretch and pat into square, first fold top and bottom in thirds, like a business letter, then do the same from both sides.

Gather dough into a ball, place seam side down into a lightly oiled bowl, cover, and let it rest for 10 minutes.

Repeat this stretch and fold 3 times, with 10 minute intervals. After last fold, cover and refrigerate overnight. (I divide the dough at this point in halves, and refrigerate it in two containers.)

DAY 2:
Remove dough from refrigerator 2 hours before using, it should have doubled.

Preheat oven to 425ºF/220ºC, including steam pan.

Shape dough into 2 small boules or bâtards. Place on parchment lined baking sheet, seam side down, and score. Mist or brush with water, sprinkle with rolled rye, cover, and let rise until doubled, ca. 60 minutes or longer (finger poke test, an indentation should not fill up again - if this soft bread is under-proofed, it bursts open in the oven)

Bake breads at 350ºF/180ºC for 20 minutes, steaming with 1 cup boiling water. Rotate breads 180 degrees, remove steam pan, and continue baking for another 20 - 25 minutes, until deep golden brown and registers at least 195ºF/91ºC.)

Cool on wire rack.

Whether oval or round - Beer Rye Breads are very attractive


Submitted to YeastSpotting

Sunday, November 18, 2012

PAN DE MUERTO - BREAD OF THE DEAD


Hier geht's zur deutschen Version dieses Posts


When we traveled for the first time to the Yucatan, I wanted (of course) to try some typical Mexican breads. The bakeries in Cancun and Tulum had beautiful displays, and we were very eager to purchase a selection of those pretty little breads and pastries.

But what a disappointment! The attractive exterior was misleading - everything we bought tasted more or less bland and sweet.

Breads and pastries in Tulum - a pretty disappointment

I couldn't believe that this was all there is to Mexican breads. Moreover, I remembered having seen once a ghoulishly decorated bread for Halloween, and, back at home, consulted with my trusted advisers on all things food - "Fine Cooking" and "Cook's Illustrated".

Fany Gerson's recipe for Pan de Muerto in "Fine Cooking" seemed promising, and had already some good reviews.

This Bread of the Dead is traditionally baked during the last weeks of October, before the Dia de los Muertos (November 1 and 2), and eaten at the cemetery, at the grave of a family member. The bone decoration is a reminder of the deceased, and the little roll on top represents a tear of grief.

I made some slight changes to the original recipe, substituting 10% of the white flour with whole wheat, and changing the technique to my preferred stretch and fold (S&F), with a slow overnight rise in the refrigerator.

A detailed instruction for S&F you can find in my earlier post here. This elegant do-ahead method requires less kneading, ensures better flavor development, and, also, fits better in my schedule.

Since other reviewers of the original "Fine Cooking" recipe warned that the actual baking time was shorter than stated in the instruction, I checked early, and found that my breads were done in approximately 36 minutes.


PAN DE MUERTO  (2 Breads) (adapted from Fany Gerson's recipe in "Fine Cooking")

127 g/4.5 oz whole milk, (1/2 cup)
  78 g/2.75 oz unsalted butter (5 1/2 tbsp.), cut into small pieces
3  4x1-inch strips orange peel (without pith)
1 tbsp. orange blossom water (or more)
       3 eggs, lightly beaten
    6 g/0.2 oz instant yeast (2 tsp)
400 g/14 oz all-purpose flour
  47 g/1.75 oz whole wheat
  50 g/1.65 oz sugar (1/4 cup)
    2 g/0.1 oz salt (1/2 tsp)
  14 g/0.5 oz butter (1 tbsp) melted, for brushing
  22 g/0.8 oz sugar (1/8 cup) for sprinkling

Peeling the orange with a vegetable peeler is easy
DAY 1
1. Put milk, butter, and orange peel in small saucepan over medium heat; stir until butter melts, 2-3 minutes. Remove from heat and let cool until warm. Discard orange peel, add orange blossom water, and whisk in eggs.

Heat milk, butter and orange peel, until butter is melted

 2. In mixer bowl, stir together flour, yeast, sugar, and salt. Add milk mixture, then mix at low speed until dough comes together and all flour is hydrated (1-2 minutes). Let dough rest for 5 minutes.

3. Resume kneading at medium-low speed for 6 minutes, dough should be smooth but still slightly sticky. (Resist the urge to add more flour, it is not necessary!)

4. Place dough on lightly oiled work surface. With oiled hands, stretch dough into a square and fold it in thirds like a business letter. Repeat this folding from both sides. Make a ball, pulling edges underneath, and place it in lightly oiled bowl. Cover with plastic wrap, and let rest for 10 minutes. 

Starting the stretching and folding


5. Repeat this stretch and fold (S&F) 3 times, in 10 minute intervals. After last fold, place dough, tightly covered, in refrigerator overnight. (Remove from the fridge 2 hours before using.)

DAY 2
6. Cut a piece about 120 g/4.2 oz off the dough and reserve. Divide remaining dough in halves and shape pieces on lightly floured surface into 2 rounds. Place rounds on parchment lined baking sheet and flatten tops with your hands.

7. With some of reserved dough, form 2 small rolls  (à 7 g/0.25 oz), cover with plastic wrap and set aside.

8. Divide rest of reserved dough into 6 equal pieces. Roll into ropes (slightly longer than width of loaves.) Starting in the middle, pinch or twist ropes with your index and middle fingers about 1 inch apart to make knobs (the pinched parts should be really thin, to preserve the bone pattern)


The ropes are quite elastic, you can stretch them to the desired length

6. Arrange 3 ropes on top of each dough round, overlapping in the center and tucking ends under a bit. Mist with baking spray, cover with plastic wrap and let rise in warm place, about 45 - 60 minutes, or until breads are doubled in size. Poke dough gently with your finger, the indentation should not fill back again (if breads don't rise long enough they will burst in the oven and destroy the pattern!)


7. Preheat oven to 350°F. Adjust rack in oven middle.

8. Dab a little cold water on top of each round where ropes meet, and put reserved dough balls on top, pressing slightly so that they stick.

Pan de Muerto - decorated with bones and tear drops

9. Bake breads for 18 minutes, then cover loosely with tin foil, and continue baking for another 18 minutes, or until they are golden brown (internal temperature at least 190ºF.)

10. Let breads cool for a few minutes on wire rack. Then brush them all over with melted butter. Holding loaves from the bottom, sprinkle sugar over the top, tilting them slightly to help coat them evenly.

Variation: Use 147 g /5.2 oz whole wheat and only 300 g/10.6 oz all-purpose flour. For the whole wheat, adjust with a little more milk, to keep the dough from getting too dry, it should be slightly sticky.

Delicately orange flavored Pan de Muerto - better enjoy it before you are dead!

Submitted to YeastSpotting and BYOB