Friday, February 14, 2014

COUNTRY BREAD WITH CHIA SEEDS - SOME LIKE IT MILD


Hier geht's zur deutschen Version dieses Posts


In 2012 I had made a New Year's resolution - to give all my baking books a fair chance.

I wanted to bake one bread from every one of them, not only from my couple of favorite books. "Equal Opportunity Baking" was born!

With Malt Rye Rolls and Saatenbrot I was off for a roaring start. Also, Muesli Rolls and
Beer Rye Bread worked out after some tweaking.

But then some loaves folllowed that either required a lot of trials, or underwhelmed me with their taste. My initial enthusiasm was dampened, and the last posts endet up with the sympathetic hobby bakers of The Fresh Loaf, and didn't make it to my blog.

That is about to change now, I renewed my resolution (please, no knowlegeable grins!) In the meantime my baking book collection didn't diminish - on the contrary! - and the to-do-list of breads is large. So, here we go!

Was it my childish resistance against praying with St. Jeffrey's faithful congregation, or an unconscious dislike of dealing with a tome - so far I haven't baked a lot from Hamelman's "Bread".


Though one bread, the wonderful "5-Grain Sourdough with Rye Sourdough", made it straight into Karin's Bread Hall of Fame, and I used his "Rye Sourdough with Walnuts" formula for testing a 1-step versus a 3-step starter. But that was it!

For my "Equal Opportunity Pledge", I wanted to kill two birds with one stone, having another go at "Bread", and finding a use for the chia seed I had just purchased for a bargain price. Therefore I chose a simple white loaf to jazz up with the omega-3-rich seeds: Country Bread.

Working with the recipe wasn't very difficult. I refrigerated the mature pre-ferment overnight, and upped the amount of water in the dough a bit to accommodate the seeds (I didn't soak them, because - according to the description on the tag - "You can eat them directly out of the package").

The dough was slightly sticky, as intended, and I gave it an extra Stretch & Fold right away, and let it ferment for an additional 50 minutes after the last S&F.

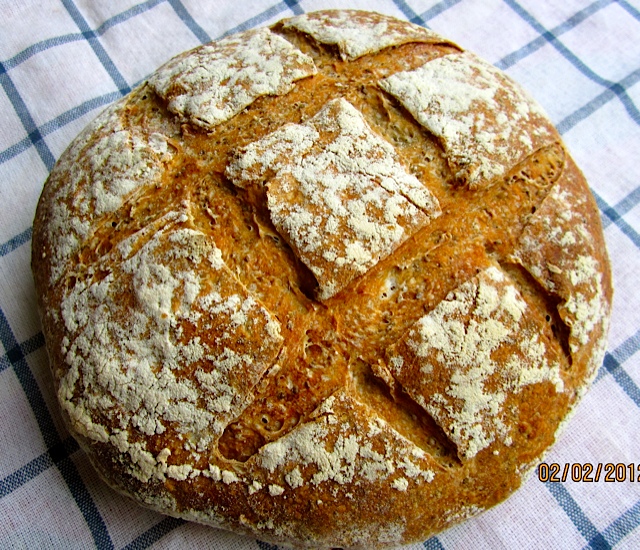
The result was a very pretty loaf, with a pleasant, slightly nutty taste - for goodie-two-shoes people who prefer a milder bread, without too much noticeable tang.


COUNTRY BREAD WITH CHIA SEEDS  (adapted from Jeffrey Hamelman's "Bread")

Pre-Ferment
227 g bread flour
136 g water
4 g/3/4 tsp. salt
1 pinch instant yeast

Final Dough
all pre-ferment
227 g bread flour
185 g water
45 g chia seeds
5 g salt
0.9 g/1/4 tsp. instant yeast

DAY 1
Mix pre-ferment ingredients just until smooth. Cover, and leave at room temperature for 12 - 16 hours (70ºF/21ºC.) It will be ready to use, when it has domed, and is just starting to recede in the center. (I refrigerated the mature pre-ferment overnight.)

DAY 2
Cut pre-ferment in 12 small pieces. Mix all final dough ingredients, at low speed, until all flour is hydrated, and dough comes together (about 3 minutes,) adjusting with a little more water, as needed. Dough should be slightly sticky.

Continue kneading at medium speed for 3 minutes more. Dough should be supple, and still a bit sticky (Desired dough temperature 75ºF/24ºC).

Transfer to a lightly oiled or moistened work surface. With oiled or wet hands, stretch and pat it into a rough square. Fold it from top and bottom like a business letter, then do the same from the left and right side. Gather dough package into a ball, tucking sides under, and place into a lightly oiled bowl.

Cover, and let rise for about 2 1/2 hours, with 2 folds at 50 minute intervals. (In my cooler kitchen the rising time was 50 minutes longer.)

Pre-shape dough into a round, and place on the lightly floured work surface, seam side up. Cover, and let relax for 10 - 20 minutes, then shape into a boule or bâtard.

Place, seam side up, into a floured banneton, sprinkle with more flour, cover, and proof for 75 - 90 minutes (at 75ºF/24ºC), or longer, when your kitchen is cooler.

About half an hour before baking, preheat oven to 450ºF/230ºC, with baking stone and steam pan.

Use the finger poke test, the bread is ready for the oven, when a dimple doesn't fill up again, only comes back a little bit. Transfer loaf to a parchment lined baking sheet (or bake directly on baking stone.) Score into desired pattern.

Bake bread for 15 minutes, steaming with a cup of boiling water. Rotate bread 180 degrees, remove steam pan, and continue baking for another 20 minutes, or until loaf is golden brown, sounds hollow when thumped on the bottom and registers at least 200ºF/93ºC.

Let bread cool on wire rack.

An attractive looking bread: mild, with a slightly nutty flavor

BreadStorm-Users, (including the free version) can download the formula here.

 
Submitted to Yeast Spotting

Tuesday, February 11, 2014

FROZEN YEAST DOUGH - WILL IT SURVIVE?

Hier geht's zur deutschen Version dieses Posts


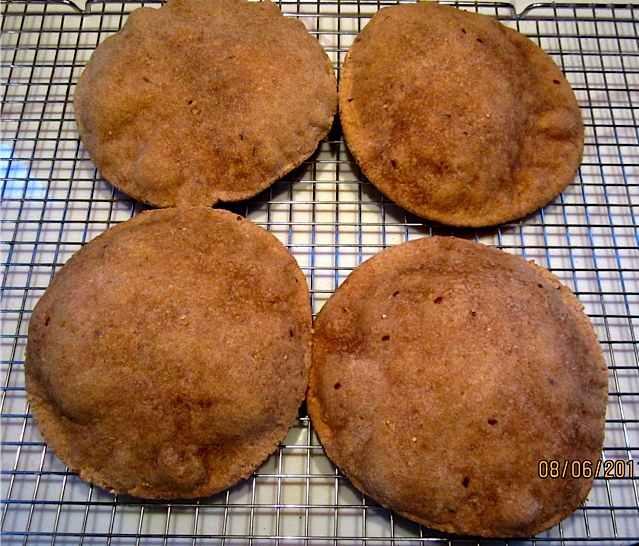
Rummaging through our basement refrigerator (inherited from my late in-laws and mostly used for retarding my doughs), I rediscovered a bag with whole grain pita dough.

After bulk fermentation I had pre-shaped the dough (made with instant yeast) into balls, placed those, individually wrapped, in a ZipLock bag, and then in the freezer.

The date on the bag was 9 months ago!

My first impulse was, of course, to throw those snow-encrusted (and suspiciously dark looking) packages into the trash. But then my curiosity and scientific instinct won, and I decided to give the Ötzi-Pitas a chance, and find out whether there was any life left in them - after all this time.

Whole grain pitas made with fresh dough
I placed them in a warm spot in the kitchen, and, while baking my usual breads for sale, checked now and then on them.

After 3 hours nothing had changed. Again I was tempted to end their misery, but decided to wait a little longer.

Fife hours passed - it appeared as if the dough balls had grown a tiny bit.

Six hours, seven, eight - very slooowly more growth.

After 10 hours the rolls were about the size they normally are, when I shaped and proofed them for 60 minutes (after their overnight stay in the fridge.)

Gescheckte Ötzi-Pitas: geschmacklich einwandfrei
I started rolling them out, the dough now reacted as elastic as a fresh one, but the surface of the pitas was darker, and somewhat mottled.

In the oven the defrosted pitas did not swell with a few large bubbles that merge before puffing like a balloon.

Instead, they showed many smaller bubbles that didn't quite manage to join into one large gas pocket.

The Ötzi-Pitas didn't look as nice as fresh ones, but otherwise performed amazingly well. And their taste was not different than fresh ones!

Facit: if you don't give up, and are patient enough to wait, the surviving, more frost resistant yeast cells are still able to do their job, albeit very slooooowly.

Discovery site basement freezer

Sunday, February 2, 2014

LEFTOVER STOLLEN? - STOLLEN TORTE WITH BLUEBERRIES

GO TO MY NEW BLOG FOR AN UPDATED VERSION!


Left to his own devices while working on some projects, the best of all husbands didn't want to spend much time on cooking or going into restaurants. But men have to eat, especially if they are tiling and putting up sinks, so he went to the supermarket and grabbed a piece of stollen, a leftover from Christmas (and heavily discounted!) 

Most of it he brought home (who can live of stollen for a sustained time?) and there it was, waiting for eager eaters, where there were only people who, after the holidays, were "stollened-out" for the rest of the year. 

Stollen leftover, ready for recycling
St. Honoré, the patron saint of bakers, must have heard my weary sigh, when I saw this Stollen of Christmas Past.

The very next day I found in my blog list a post by master baker Wolfgang Süpke: the leftovers Stollen Torte!

Having a smaller piece of stollen, I downsized the recipe from 28 cm/11" diameter to 21 cm/9".

Since the store bought stollen was quite sweet, I reduced the sugar a bit, and added some lemon and vanilla.

And, living in Maine, I used (frozen) wild blueberries instead of a preserve (and doubled the amount.) The quark in the filling I substituted with cream cheese.

We liked the torte very much. The sweetness of the stollen bottom was balanced by the berries and slightly lemony cream filling.

Stollen Torte looks nice with a simple blueberry topping, too


STOLLEN TORTE  (adapted from Wolfgang Süpke)
(12 servings)

Cake
560 g/20 oz blueberries, fresh or frozen (I used wild Maine blueberries)
420 g/15 oz stollen, cut in thick slices (1.5 cm/0.6")
130 g/4.5 oz sugar
17 g/0.6 oz gelatin powder
56 g/2 oz cold water
225 g/8 oz whipping or heavy cream, at room temperature
225 g/8 oz cream cheese, at room temperature
225 g/8 oz low fat yogurt, at room temperature
1/2 tsp. vanilla extract
3 tbsp. lemon juice, or more to taste
2 tsp. lemon zest, or more to taste

Frosting and decoration
1/2 cup whipping or heavy cream
blueberries

Cook blueberries with 20 g of the sugar, until they break down, and the liquid is reduced by about a third (too much juice will leak out of the cake bottom.)

Grease 21-cm cake rim (or ring of a springform pan), then dust with powdered sugar.  Place on a parchment lined baking sheet. Fill ring with stollen slices, filling out holes with smaller pieces.

Fill cake ring with stollen slices

Spoon cooked blueberries evenly over stollen bottom. 

Distribute blueberries over stollen layer

In a small bowl, stir gelatin into the water, and let sit until water is absorbed. Microwave until mixture is dissolved, stirring now and then.

Mix cream cheese filling

Whisk cream until soft peaks form. In second large bowl, mix cream cheese, yogurt, sugar, vanilla, lemon juice and lemon zest, until well combined. Stir in whipped cream, mixing well.

Spread filling over blueberries

Temper melted gelatin by adding 3 tablespoons of the cream mixture, one by one, mixing until well combined.(If the gelatin clumps because you didn't work fast enough, briefly nuke it in the microwave again.)

Pour gelatin in cream mixture, stirring until well blended. Pour filling over blueberries, smoothing surface with rubber spatula. Cover, and refrigerate torte overnight.

After removing the ring, the sides have to be frosted

To serve, remove cake ring. Frost sides with whipped cream, then decorate the top. (I made small circles on top and fill them with blueberries.) Or simply sprinkle it with blueberries.

Update 12/30/15: In the meantime, I have made the Stollen Torte with leftover stollen, panettone, and poppy seed stollen - all tasted wonderful!

Stollen Torte with Blueberries

Saturday, January 18, 2014

EINKORN HAZELNUT LEVAIN À LA FORKISH - PINCHED, NOT KNEADED!


Einkorn Hazelnut Levain à la Forkish
Hier geht's zur deutschen Version dieses Posts


A while ago I needed to add another book from my Amazon wish list to qualify for free shipping. More or less randomly, I picked Ken Forkish's: "Flour, Water, Salt, Yeast" - the price was right!

When I started leafing through the book, I was intrigued by his approach to kneading - or, better, not kneading the dough. From Dan Lepard's Pumpkin Whey Bread I knew that very brief kneading (30 seconds), followed by some folds, can be sufficient to process some doughs - but pinching?

Walnut Levain - my first take at Forkish's breads.
Usually I don't mix my doughs by hand (my skin is very dry) so I used a large wooden spoon for stirring flour and water together.

But Forkish is right, using your hands is much faster, and you have less cleanup afterwards.

During the pinching and folding process, the dough behaved exactly as it should: rising, then leveling out after each fold, calling for the next round.

And getting more elastic and smoother after each turn!

Forkish's descriptions are precise, and detailed, but, nevertheless, there were stumbling blocks on the way, and it took more than one trial to finally master the whole process.

Why the waste? You are supposed to build a huge amount of levain, only to use a small percentage of it for your final dough - the rest goes in the trash. Sure, flour and water don't cost much, but this is definitely not my idea of frugality and environmental consciousness!

The rationale behind this waste? Beats me. The breads taste great, even when made without all this splurging. Does a loaf, made with just as much levain as needed, taste any different from one where the starter came out of a big bucket? Hard to believe!

Sticky wicket: if you don't flour the rising basket really, really well (whether lined, or not), this can happen:

Oh, nooooo!!!

Don't think you can ease the proofed bread with your usual gentle coaxing from the basket. Forget your good manners - your dough needs slapping! After the sticky wicket of breads that stubbornly clung, and then deflated in the extraction process, I finally checked YouTube.

A bread that turned into a flounder (Overnight Brownie)

And there it was: I saw master baker Forkish slamming the banneton with gusto on the counter - brutal force did the trick! After this eye-opener I was less timid, and the breads finally let go.

Soft skin vs. hot pot. Not afraid of third degree burns, Ken Forkish places the bread smoothly into the Dutch oven. Others, with less experience, might not be so lucky. But there is an easy way out: the paper sling!

Use parchment paper for a painless transfer (Overnight White)
This worked well for other DO  breads I baked, like Aroma Bread. Therefore, save your skin - use parchment for a painless transfer.

Once these snafus were overcome, every bread I made from "Flour, Water, Salt, Yeast", plus my "à la Forkish" variations, turned out great.

"Bold baked" crust, holey crumb, and extraordinary taste - my random pick to fill my shopping cart at Amazon became one of my favorite baking books!

A&B Naturals, my favorite food store (they sell my breads!) just started carrying Einkorn flour, and I love hazelnuts. This is the formula I came up with, combining both in a loaf à la Forkish.

I include the first step - refreshing your starter to make a Forkish levain - and a time schedule.

EINKORN HAZELNUT LEVAIN

1. Step: Forkish's basic levain
12 g mature levain (your default)
48 g water (90ºF/32ºC)
48 g bread or AP flour
12 g whole wheat

 2. Step: Levain  (24 hours later)
12 g of the Forkish levain
48 g water (90ºF/32ºC)
48 g bread flour
12 g Einkorn flour

Final dough
302 g bread flour
138 g Einkorn flour
342 g water (90ºF/32ºC)
113 g hazelnuts, toasted, halved, or very coarsely chopped
11 g salt
120 g levain (all)*)

*) Following Forkish's recommendation I use a little more levain because my kitchen is usually cooler than 70ºF/21ºC (120 g instead of 108 g)

DAY 1
7:00 - 9:00 a.m. Feed your default starter to turn it into a Forkish Levain. (With this small amount the hydration of your starter doesn't matter too much, if it's between 75 and 100%.)

Lively levain

DAY 2
7:00 - 9:00 a.m. (24 hours after feeding your mature starter à la Forkish)
Refresh levain. Cover, and leave at room temperature for 7 - 9 hours.

Hydrating flours

2:00 - 4:00 p.m.
In large bowl, mix flours and water by hand, until all flour is hydrated. Cover, and let rest for 30 minutes.

Adding levain and salt

Pinching the dough...

...then folding it

Sprinkle salt over flour mixture and add levain. Prepare a bowl with water (for dipping your hands.) With (wet) hands, fold dough from sides over to the center, then, working like a pincer, pinch dough several times, alternating with folding, until dough is smooth, about 5 - 6 times. (DDT: 77º-78ºF/25º-26ºC.)

Let dough rest for 10 minutes, then incorporate nuts the same way.

Incorporating nuts (Forkish's Walnut Levain)

Fold dough three times more, twice at 20 minute intervals, the last time before going to bed. Leave, well covered, at room temperature overnight.

Dough should have tripled overnight (Forkish's Field Blend #2)
DAY 3
After 12-15 hours the dough should have tripled. Prepare a very generously floured rising basket.

Flour gives the sticky dough a "skin" underneath, so that you can fold it

Transfer dough to a floured area on an (otherwise unfloured) work surface. With floured hands, gently fold sides towards the middle to make a round. (The flour "skin" on the underside prevents sticking.)

Folding sides over to make a round

Then flip the round gently over, seam side down, onto the unfloured area. With floured hands, pull dough ball towards you, until you have a medium-tight boule.
 
Flip package over and shape into a ball (Overnight Blondie)

Place dough round, seam side down, in proofing basket, sprinkle generously with flour, cover well, and proof for about 3 - 4 hours.

Bubbly ball in banneton

3/4 hours before baking, place Dutch oven (with lid) on the middle rack, and preheat oven to 475ºF/245ºC.

Nice rise: the dough should at least double in size (Overnight Brownie)


Dimple should remain visible (Einkorn Hazelnut Levain)
The dough should at least double in size, use the finger poke test to decide whether it is ready to be baked.


Finger poke test:
Gently press a dimple with your finger in the dough - it should still be a bit elastic, but not fill up again, and stay visible. 


Place parchment paper on counter and place bread on it, smacking the banneton energetically on the counter! Cut off the 4 corners of the paper to make a sling.

Proofed bread on a parchment paper sling

Remove hot DO from oven, and put bread (with the paper) into it. Replace the lid.

Bake for 30 minutes, then remove the lid, and bake it for 20 - 25 minutes more, or until bread is medium to dark brown (internal temperature 210ºF/99ºC).

Forkish likes the "bold bake" - me too! (Overnight Blondie)

Tilt Dutch oven to slide bread out (the paper is now too brittle to serve as sling), and let loaf cool on wire rack. Let it rest for at least 20 minutes before slicing.

Einkorn Hazelnut Levain

(To illustrate the process I used photos of different Forkish breads I made, therefore colors and structure differ a bit.)

Here you can see my baker's percentage (BreadStorm users (including the free version) can download the formula here):

 
Great fun to read: Kiseger's (The Fresh Loaf) hilarious post about her take on this bread: Einkorn & Kamut.


Submitted at Yeast Spotting

Submitted at Panissimo:  Bread & Companatico                                       
                                        Indovina chi viene a cena                                             


Sunday, January 5, 2014

CHOCOLATE CHEESECAKE BROWNIES

Hier geht's zur deutschen Version dieses Posts


The new year started on a bad foot - from a baker's perspective. My sleek new scale, one of last year's Groupon deals, let me down, just when our monthly ABC challenge was due.

The stores were closed on New Year, no new batteries could breathe life into the scale, and I did my best to fight early withdrawal symptoms with Maggie Stiefvater's "Raven Boys", and my daughter Valerie's Death-by-Chocolate-Cookies.

With the scale revived, the ABC Baker's first project of the year, Chocolate Cheesecake Brownies, (a recipe from King Arthur,) could finally get under way.

I used half of the recipe, a large pan full is a bit too much just for us two.

Warned by fellow bakers that the brownies were too sweet, I reduced the sugar in both batters, and cut down on the salt, too.

I also exchanged some white flour with whole wheat.

Coffee enhances chocolate flavor (and vice versa), so I added this optional ingredient.

And a bit of orange flavor would give some pizzazz to the vanilla cheesecake batter.


CHOCOLATE CHEESECAKE BROWNIES
adapted from King Arthur Flour

(16 small pieces)

Chocolate Batter 
113 g unsalted butter (1 stick)
175 g sugar
  53 g cocoa
1/4 tsp. salt
1/2 tsp. baking powder
1/2 tsp. espresso powder
    7 g vanilla extract
    2 eggs
  30 g all-purpose flour
  30 g whole wheat pastry flour
170 g bittersweet or semisweet chocolate chips

Cheesecake Batter
226 g cream cheese (1 package), at room temperature
  50 g sugar
  28 g all-purpose flour
    1 tsp. vanilla extract
    1/2 - 1 tsp. orange zest
  28 g heavy cream
    1 egg

Preheat oven to 350°F/175ºC. Line an 8" x 8" baking pan crosswise with 2 stripes of parchment paper (8" wide), and long enough to hang over the sides.


Cook butter/sugar mixture until smooth and shiny

For the brownie batter: In a medium saucepan, melt butter, then stir in sugar, cooking until mixture is smooth and shiny. Remove from heat, and stir in cocoa, salt, baking powder, espresso powder, and vanilla.

Stir flour last into the chocolate mixture

 Whisk eggs in the (slightly cooled) mixture, then flour, stirring until smooth. Set aside.

The cheesecake batter can do with a little orange pizzazz

For the cheesecake batter: Beat cream cheese until no lumps remain. Mix in sugar, flour, and orange zest, then vanilla extract, cream, and egg, until combined. Set aside.

Fold chocolate chips into the brownie batter. (It should have cooled a bit, so that the chocolate will not completely dissolve.)

Pour half of the chocolate batter in the pan

 Spoon half of the brownie batter into the prepared pan, then top with cream cheese batter.

Spoon cream cheese batter over chocolate bottom layer

Dollop remaining brownie batter onto cream cheese. Using a fork, swirl the two upper layers into a marble pattern. (My marbling could do with a little improvement.)

My marbling could improve a bit

Bake brownies for about 45 minutes, rotating pan after half the baking time (for even browning,) until a tester comes out clean (if it doesn't hit a chocolate chip), and the edges are set, but the middle still feels springy to the touch.

Using the parchment paper overhang as handles, lift cake out of the pan and set on a wire rack to cool.

My brownies were a little bit too long in the oven

The brownies were nice and moist, fudgy and very chocolate-y, with a hint of orange. Since they are so rich, I recommend cutting them in fairly small pieces.  We liked them best warm, with vanilla ice cream and a few chopped pecans.

Wrapped in aluminum foil and stored in a cool room, the brownies keep for at least 3 days. You can also freeze them.