Saturday, March 3, 2012

DARK CHOCOLATE CUPCAKES

Hier geht's zur deutschen Version dieses Posts


When I saw the original name of these: "Emergency Blender Cupcakes", I almost decided to skip this month's ABC challenge. "Emergency" sounds like "fast food", using "just some stuff you might have at hand", like "throwing something haphazardly together". In other words - not very enticing for an avid baker!

But, trusting Hanaâ's judgement, and keeping in mind that the Cinnamon Rolls from "The Weekend Baker" had been fantastic (see my blog), I overcame my reservations, studied the recipe, and couldn't find anything in the list of ingredients to confirm my arrogant assumptions.

The cupcake batter is, indeed, mixed in a blender, but can be easily made in a regular mixer, too. And that's what I recommend, for I couldn't see any advantage in the "blending". The sides of the bowl had to be scraped down several times, it's more difficult to empty it out, and the mixing process is not any faster.

After 17 minutes baking time, the cupcakes domed nicely, showing moist, glistening cracks, as they should. And while they were still hot from the oven, the best of all husbands came into the kitchen and shamelessly grabbed one, under the pretext that he loved lava cake, and didn't care for frosting, anyway (wait and see...!)

Like the cake batter, the frosting was easy to prepare. As a Mainer, coffee addict, and proud owner of a pantry full of flavored liquors (don't get me wrong - as fancy ingredients, not for raw consumption!), I couldn't resist adding a tablespoon of Allen's Coffee Brandy to the mixture. (Two wouldn't have hurt, either.)

Abby Dodge, the author of "The Weekend Baker", admits to having a weakness for mountains of frosting. I saw that comment only after I was wondering how much was left in the bowl. But when I took my first bite, I realized her wisdom in piling the fudgy chocolate higher on the cakes. This frosting alone was worth the effort! (Half of the amount is plenty, though).

Chocolate on chocolate - a finishing touch was clearly needed. Though I always like something crunchy to bite on (Ben & Jerry's spoiled me for plain chip and chunk-less ice creams), sugary, colored sprinkles, as suggested in the recipe, don't do it for me. A nut topping was the obvious alternative. I used toasted walnuts, but hazelnuts would have been just as good.

In spite of their unassuming name, the cupcakes are delicious. Intensely chocolate-y and moist, not too sweet, and with the best chocolate fudge frosting I've ever tasted. The toasted walnut topping adds a satisfying crunch.

And the best of all husbands? Did he shun the frosted goodies? Guess, what .....


DARK CHOCOLATE CUPCAKES  (adapted from "The Weekend Baker")

Cakes:
43 g/1.5 oz        unsweetened natural cocoa (not Dutch processed)
175 ml/3/4 cup hot water
128 g/4.5 oz      all-purpose flour
227 g/8 oz         sugar
1/2 tsp              baking soda
1/4 tsp              sea salt
107 g/1/2 cup   canola or other vegetable oil
1                       large egg
1 1/2 tsp           vanilla extract

Frosting:
114 g/4 oz        bittersweet chocolate (60%), chopped
57 g/4 tbsp       unsalted butter
160 g/1/2 cup   sweetened condensed milk
40 g/1/8 cup    light corn syrup
1/2 tsp             vanilla extract
1 tbsp              coffee flavored liquor (optional)
1 pinch            salt
1/2 cup            walnuts, toasted and chopped, for topping


Preheat oven to 375ºF/190ºC. Line muffin pan with cupcake liners.

In a small bowl, whisk together hot water, oil, vanilla, and egg. In a medium bowl (with a spout), whisk together flours, cocoa, sugar, baking soda and salt. Add wet ingredients to dry ingredients and whisk until blended, ca. 1 minute.

Divide batter evenly between cupcake liners. Bake until needle comes out clean, 17 - 19 minutes. (Don't over-bake, the cracks on the surface should still look moist). Cool pan on wire rack for 10 minutes, then remove cupcakes from pan, and let cool completely before frosting.

Melt chocolate and butter in double boiler. Remove from heat and add condensed milk, corn syrup, vanilla, coffee liquor, and salt, whisking until well blended. Let cool to room temperature, whisking frequently.

With small spatula, spread frosting generously on top of cupcakes. Sprinkle with toasted walnuts.

Cupcakes can be stored, covered, up to 4 days at room temperature. Frosting can be stored for 3 weeks in refrigerator (leftovers can also be warmed and used as fudge sauce).

 
The original recipe you find in "The Weekend Baker", and in Abby Dodge's website (though here with a marshmallow frosting): 

And if you'd like to join the Avid Baker Challenge - there's definitely room for more! 

Wednesday, February 8, 2012

SAATENBROT - GERMAN MANY SEED BREAD


Hier geht's zur deutschen Version dieses Posts


The best recipe collection (bread, rolls and snacks) of German bakers' magazine,
"Allgemeine Bäckerzeitung", supplied this "seedy" bread for my "Equal Opportunity Baking" list.

A heavy weight, scaled for 21 loaves, with selling points, marketing tips, production cost and time calculation, including sales tax (7%) and even a suggested retail price (1.83 Euro). The production steps are briefly listed - no need to explain to professionals what they do every day.

Scaling the ingredients down to home baking proportions was not difficult (a minimum of 3 loaves), and the instructions, though brief, were precise, and didn't overtax my mental capacities.

The recipe said (more or less) only: "make a dough". I tried to stretch and fold it, but that didn't work too well, the dough was too wet. Therefore, instead of soaking only the flaxseeds in hot water for 1 hour (original recipe) I would include some of the flour in the soaker, to have a larger preferment, and more water already absorbed in the flour.

I like to retard my doughs, overnight fermentation works better for my schedule, and, also, improves the taste (the original recipe had only the longer starter development.)

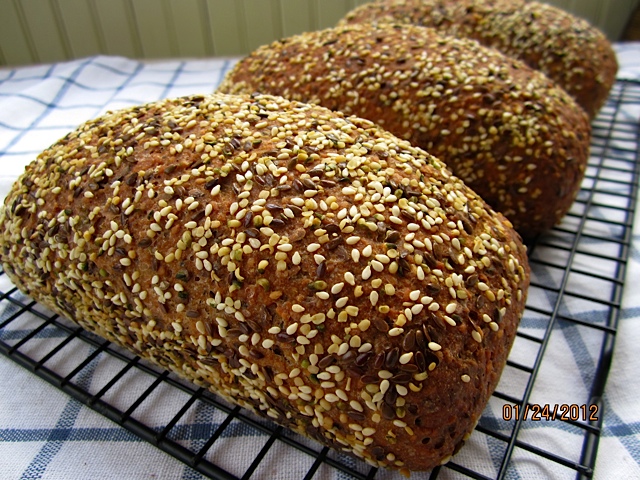
The Bäckerzeitung says: "roll the shaped loaves over a wet towel, and then dip them into the (topping) seed mixture". Though this coated the breads nicely with seeds, they didn't stick well enough, and a lot of them fell off during and after baking. Next time I would brush the loaves with egg white, instead of just moistening them with water.

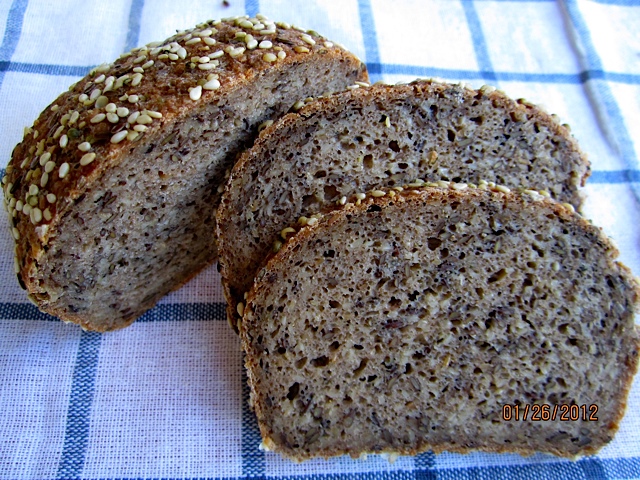
The breads turned out very nice, crusted with seeds they looked quite attractive, and the taste? Modestly (haha!) I will only quote my friend Lynn - beneficiary of this triplet bake: "Our seedy, seedy bread was delish! We toasted it which really brought out the flavor of the seeds! Mmmmmmm!"

SAATENBROT - MANY SEED BREAD (3 loaves, ca. 600 g each)

SOAKER
143 g whole wheat flour
  84 g medium rye flour
299 g water
     4 g salt
129 g flaxseed

 STARTER
  21 g rye mother starter (mine is 100% hydrated)
214 g medium rye flour
214 g water, lukewarm

FINAL DOUGH
130 g medium rye flour
143 g bread flour
187 g water
    5 g instant yeast
  12 g salt
129 g sesame, toasted
129 g hemp seeds
    2 g anise, caraway, fennel and/or coriander
    1 egg white (for brushing)
 14 g sesame seeds (for topping)
 14 g hemp seeds (for topping
 14 g flaxseed (for topping)

 DAY 1:
In the morning, stir together all ingredients for soaker, cover and let sit at room temperature. Mix all ingredients for starter (in 1-step), cover and let ferment at room temperature.

In the evening, mix together all ingredients for final dough for 1 - 2 minutes on low speed. Knead on medium-low speed for 4 minutes (or knead by hand). Let dough rest for 5 minutes. Resume kneading for another minute (dough will still be somewhat sticky). Divide dough into 3 portions, place in oiled containers, cover and refrigerate overnight.

DAY 2:
Remove dough from refrigerator 2 hours before using. Shape into sandwich loaves, or bâtards for free standing loaves. Brush breads with egg white, and then roll over seed mixture.

Place breads in oiled loaf pans, if making sandwich loaves, or bâtards on parchment lined baking sheet (no scoring.) Mist with spray oil, cover, and let rise for 45 - 60 minutes, or until they have grown 1 1/2 times their original size.

Preheat oven to 240ºC/465ºF, including steam pan. Place breads in oven, steaming with 1 cup of boiling water.  Bake at falling temperatures: 10 minutes at 240ºC/465ºF, 10 minutes at 220ºC/428ºF, then turn loaves out onto baking sheet, remove steam pan and continue baking for 10 minutes at 200ºC/400ºF, and 10 minutes at 180ºC/355ºF. The internal temperature should be at least 200 F/93 C.

Let breads cool completely on wire rack before slicing.

Update: I made them again, this time with chia instead of hemp seeds, and as free standing bâtards. With flour included in the soaker, it was much easier to handle the final dough. Brushing the loaves with egg white worked much better for the seed topping than the wet towel method.

Saatenbrot - Many Seed Bread


The German version of this post you'll find here.                                    Submitted to YeastSpotting

Wednesday, February 1, 2012

(UN)GLAZED CINNAMON ROLLS

Hier geht's zur deutschen Version dieses Posts (folgt noch)


Fellow baker Hanaâ instigated me to buy yet another baking book - as if my bookshelves were not already buckling down under the weight of my cooking library. She invited me to join her ABC baking challenge, every month trying out a new recipe, currently from Abby Dodge's: "The Weekend Baker".

My husband loves sticky buns and their sugar laden relatives, but, though I like cinnamon, I was never very fond of the overly sweet stuff, he would sometimes buy. Therefore, without Hanaâ's challenge, I would probably never have thought of baking cinnamon rolls.

What I especially like about "The Weekend Baker" and this recipe, are the several "do ahead" options. I prefer working with slow fermentation, and most doughs show their appreciation for the cold treatment with a significant better taste, so, after a 30-minute rise, I put my my dough to sleep in the fridge overnight.

I always try to incorporate some whole grains in my recipes, a substitution of 10% white flour with whole grains doesn't require additional liquid, so I replaced 47 g of all-purpose flour with whole wheat pastry flour.

The recipe was easy to follow, and the next morning the dough had nicely risen in the fridge. I rolled it out cold - it will come to room temperature quickly - and the filling was no problem, either. Next time I probably would add some toasted, chopped nuts, though.

Cutting a roll of dough in even slices with a bench scraper or knife is not that easy, the layers slipping away over the crumbly filling. Using dental floss, as Hanaâ suggested, works much better.

I skipped glazing the rolls, nice as it looks, it adds even more sugar, without contributing to the taste. And even without this decoration - the cinnamon rolls looked beautiful when they came out of the oven and their wonderful aroma filled the whole house, so that I could hardly wait to try one until they had cooled down a bit.

"... now I know their taste - now I'm a believer..." you don't have to be a Monkee to love these treats!
I am converted, and my husband could wallow in them, so good are they!

They, also, freeze well, wrapped in plastic foil and then placed in a ziplock bag. To enjoy them you only have to nuke them for a few seconds, and then re-crisp them at 350ºF/175ºC for a few minutes in the oven.

I can only encourage everybody to purchase Abby Dodge's "The Weekend Baker" - I got it, used, at amazon. But, if you would like to bake the cinnamon rolls, and don't have the book, Abby posted the recipe in Cookstr http://www.cookstr.com/recipes/glazed-cinnamon-rolls-2

And if you would like to join the ABC challenge - Hanaâ will be happy to welcome you (if you are not a jerk!)

Monday, January 23, 2012

MALT RYE ROLLS WITH SESAME & PUMPKIN SEEDS


Hier geht's zur deutschen Version dieses Posts


My first "Equal Opportunity Bread" (see my last post) had to be a batch of rolls. I like having a supply of rolls in my freezer, when we come home from a trip, and want a bread that thaws less sluggish than a large loaf.

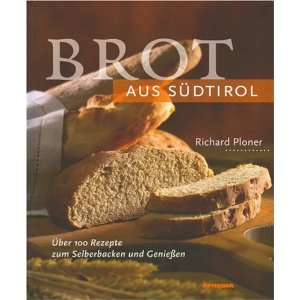
So I grabbed one of my most favorite baking books - hey, who said I couldn't include my favorites in my fair baking? - "Brot aus Südtirol". Richard Ploner's breads are all small, mini breads, or rolls. The (professional baker's) reasoning: "They should all have the same size in a mixed bread basket".


This baking book has everything going for it, interesting recipes and appetizing photos. Unfortunately, it has not been translated into English, yet. Because of this sad omission I am happy to be able to translate at least some of its wonderful recipes for English speaking bakers.

The one thing I always change - apart for an adaptation of the ingredients to what is available in the US - are the very short fermentation times. Ploner doesn't retard his doughs, but I do, using either pre-doughs or the Stretch-and-Fold technique (S + F) and I am sure that even these nice breads benefit from it.

The original recipe lists sugar caramel color (15 g) - I didn't have it and didn't see a real need for it, either. Richard Ploner lets you choose between toasted soy flakes and pumpkin seeds - for me a no-brainer, since I love toasted pumpkin seeds, and buy them in bulk. The sesame seeds I toasted, too, to enhance their "nuttiness".

MALZBROT - TYROLEAN MALT RYE ROLLS WITH SESAME AND PUMPKIN SEEDS

    6 g instant yeast (or 9 g active dry)
280 g water, lukewarm
300 g all-purpose flour
100 g medium rye flour
100 g whole wheat flour
    5 g malted barley flour (non diastatic) (1 1/2 tsp)
    5 g sugar (1 tsp.)
    6 g sesame seeds, toasted (2 tsp.)
  50 g pumpkin seeds, toasted, chopped
    3 g caraway (1 tsp.)
  10 g salt

DAY 1:
1. Dissolve instant yeast in warm water. (Though this is not strictly necessary, it helps with the stretch-and-fold technique.) Mix with other dough ingredients to form a rough ball, 1 - 2 minutes on low speed (or with a wooden spoon). Let dough rest for 5 minutes.

2. Knead on medium-low speed (or by hand) for 2 minutes, adjusting tablespoon-wise with more water, if needed (dough should be a bit sticky). Continue kneading for 4 more minutes, the last 20 seconds at medium-high speed (dough should still be more sticky than tacky).

3. Transfer dough to a lightly oiled work bench, and, with wet or oiled hands, stretch and pat into a rough square, then fold it in thirds like a business letter. Fold it the same way again from the short sides. Tuck sides under dough to shape a ball, and place dough package in oiled bowl, seam side down. Cover, and let rest for 10 minutes.

4. Repeat S & F for 3 more times at 10 minute intervals (total time 40 minutes). After the last fold, place into oiled container, cover, and refrigerate overnight.

DAY 2:
5. Remove dough from refrigerator, it should have doubled in size.

6. Preheat oven to 428ºF/220ºC, including steam pan. Divide dough into 10 equal pieces. Pre-shape into rounds. Cover and let relax for 5 minutes.

7. With both hands, roll rounds into 10-cm/4" long strands, with tapered ends. Place, seam side down, on parchment lined baking sheet. Score lengthwise. Mist with oil spray, cover with plastic foil, and let rolls rise for 45 - 60 minutes, or until they have grown ca. 1 1/2 times their original size.

8. Bake rolls for 12 minutes, steaming with 1 cup of boiling water. Remove steam pan and rotate rolls 180 degrees for even browning. Continue baking for another 13 minutes, until they are golden brown. Leave rolls in switched-off oven with door slightly ajar for 5 more minutes, then let them cool on a wire rack.

Submitted to Yeast Spotting.

A FAIR CHANCE FOR ALL BAKING BOOKS

Hier geht's zur deutschen Version dieses Posts


Like some teachers have their "pets", I have some favorite baking books that I always turn to when I'm looking for new recipes.

 These books have old envelopes, supermarket receipts, movie tickets, and other odd papers stuck between pages as markers, my own volume/weight conversions (or corrections), and lots of scribbled comments.

And, they are also graded with stars, enthusiastic exclamation marks, or a scathing: "Not that great!"

Then there are The Others, bought or received as presents, that, for some reasons, never captured my attention.

Either because they have no appetizing photos, their layout is too dull, their write-up too boring (yes, I am that shallow!), or I just forgot all about them.

They end up in a dark corner of my bookshelf, forsaken and forlorn, probably hiding treasures that no one will ever know in the Anderson house - and NOBODY CARES!

This shameful negligence has to come to an end - these books are people, too! They, too, deserve a chance to be looked at, taken seriously, and, maybe, supply the next candidate for Karin's Bread Hall of Fame.

So my New Year's Resolution is this Equal Opportunity Pledge -  fair treatment of all my baking books, every one shall have a chance, no more "pet baking", but equal opportunity for all those disadvantaged recipe collections, that never saw the light of my kitchen!


LIST OF "EQUAL OPPORTUNITY BREADS"

Malzbrot - Malt Rye Rolls (Richard Ploner:"Brot aus Südtirol")


Saatenbrot - German Many Seed Bread ("Die besten Rezepte aus der Allgemeinen Bäckerzeitung")


Müslibrötchen - Muesli Rolls (Erika Casparek Türkkan et al.:"Brot und Kleingebäck"


Beer Rye Bread (Bill Middeke:"Baking with the St. Paul Bread Club") 


Country Bread (Jeffrey Hamelman: "Bread")


PENDING: Arkatena Bread (Andrew Whitley: "Bread Matters")
PENDING: French Walnut Bread - Pain au Levain Complet aux Noix (Daniel Leader: "Local Breads")


 PENDING: Camembert-Trauben-Brot - Camembert Grape Bread (Bernd Armbrust: "Brot")

PENDING: Mandel-Vollkorn-Brot - Wheat Almond Bread (Cornelia Zingerling:"Brot backen")


PENDING: Pain au Levain de Sarrasin (Niels Schöner: "Notes From a Floury German Kitchen")


Jan Hedh: Cosa Nostra Bread ("Swedish Breads and Pastry") 
Peter Reinhart: Croissants ("Artisan Bread Every Day")
Fany Gerson: Conchas Blancas ("My Sweet Mexico")
Dan Lepard: Red Wine Loaf with Pine Nuts and Figs ("The Art of The Handmade Bread")
Bauernbrot - Farmers' Loaf ("Brotrezepte aus ländlichen Backstuben")
Vollkorntoastbrot mit Leinsamen - Whole Grain Toast Bread with Flaxseed ("Brot backen - Köstliche Rezepte aus der guten alten Zeit")
E. and J. Wood: Cranberry-Nut Sourdough ("Classic Sourdoughs")
Ute-Marion Wilkesmann: Allerweltsbrötchen - Ordinary Rolls ("Brötchen statt Brot")
Chad Robertson: Basic Country Bread with Sesame ("Tartine")
Rose Levy Beranbaum: Golden Semolina Torpedo - Altamura ("The Bread Bible")
Richard Bertinet: Breton Bread ("Crust")
J. Alford and N. Duguid: Ethiopian Spice Bread ("Flatbreads and Flavors")
R. Topp and A. Riffert: Heilkräuterbrot - Healing Herb Bread ("Vollkornbäckerei zu Hause")

So far, so good. There might be more..... 


Friday, January 13, 2012

OMI'S GERMAN PANCAKES

Hier geht's zur deutschen Version dieses Posts


Americans like their pancakes big and fluffy, with butter not only in the batter, but, also on top of them. I grew up with thin, crispy German Pfannkuchen, and can't get used to thick, doughy ones.

Though pancakes are, in my opinion, the wrong place to go low fat, I prefer the butter in the skillet, for crisp baking, not melting on top of my pancakes.

The sugary sweet sirup, poured over the stack, was another novelty for me, Germans sprinkle their pancakes with cinnamon sugar, and serve them with fruit compote..

Since the best of all husbands and I love pancakes for brunch, we found a good compromise. 

My Omi was a very good cook
Either I follow my grandmother's Pomeranian recipe, or Richard mixes the contents of some packages, throws an egg in, and dilutes it to Pfannkuchen consistency.

Meanwhile, I grew fond of maple syrup, but I need some tangy fruit sauce to balance its sweetness.

Omi's recipe can serve as base for sweet and savory pancakes.

 I changed it a little bit, adding vanilla extract and substituting some of the white flour with whole wheat, but otherwise it remains:


OMI'S PANCAKES:
(2 - 4 servings, depending on your appetite)

100 g all-purpose flour
 25 g whole wheat pastry flour (or more AP)
 2 eggs, separated
125 g buttermilk
1/8 tsp. baking powder*)
1 pinch salt
1 tsp. sugar
1/4 tsp. vanilla extract
sparkling water, for adjustments

Add-ins
berries, banana or apple pieces (optional)
almond slices or chopped nuts (optional)
 
butter, for baking

How to make:
In large bowl, mix flour, baking powder, egg yolks, buttermilk, salt, sugar and vanilla extract until well blended. Adjust with sparkling water, until mixture is fairly thin, like crêpe batter. Fold in add-ins.

In separate bowl, whisk egg whites until soft peaks form. Fold into flour mixture.

Whipped white makes the pancakes light

Heat heavy skillet over medium heat. Melt 1 tbsp. butter, and, with a ladle or large spoon, pour batter for 1 large or 3 small pancakes into pan. When edges start to brown, after 2-3 minutes, flip pancakes over (adding more butter to pan if necessary,) and bake until they are golden brown. Place on warmed plate and keep warm.

Repeat, until all batter is used. Serve with maple syrup, or sprinkle with sugar. We like them with blueberry or other fruit compote.

Savory Pancakes:
Substitute 1 tbsp. grated Parmesan for the sugar and vanilla extract. Fold in cubed ham, grated cheese, chopped fresh herbs or other savory add-ins.


*)My grandmother didn't use any baking powder - the whipped egg whites and the sparkling water can do the (not so) heavy lifting quite well. If you leave it out, let the batter rest for 30 minutes, before folding in the egg whites.

(Post re-written and updated 2/26/14)

Thursday, November 24, 2011

PAIN AU LEVAIN WITH FARRO


Farro, or Emmer, an ancient kind of wheat, is popular in some parts of Italy, and, ever since I purchased Maria Speck's wonderful book "Ancient Grains in Modern Meals", also in our family.

Creamy farro with honey roasted grapes became our new breakfast favorite that even my picky, normally no-breakfast-type son wolfed eagerly down:
http://daleydish.com/blog/2011/03/creamy-farro-with-honey-roasted-grapes.html

With this delicious experience in mind, I felt inspired to come up with a recipe for a bread with farro. I wanted a straightforward bread, with sourdough, but not too tangy, to showcase the farro. I used whole farro kernels that I ground in my little hand cranked mill (with the additional "benefit" of a good arm muscle workout).

I am very happy with the result, a pleasantly mild, nutty tasting bread.  


PAIN AU LEVAIN WITH FARRO

LEVAIN
1. step
20 g wheat or rye mother starter (100% hydration), OR 16 g of apple or raisin yeast water
8 g water, lukewarm
20 g bread flour

2. step
42 g levain 1. step (all)
16 g water, lukewarm
42 g bread flour

3. step
100 g levain 2. step (all)
100 g water, lukewarm
200 g bread flour

SOAKER
314 g farro flour
236 g water
6 g salt

FINAL DOUGH
all soaker
all levain
314 g bread flour
6 g salt
202 g water
rolled wheat or other flakes for topping

DAY 1:
Mix soaker ingredients, let sit at room temperature.

For the 3-step levain: mix ingredients for mother, and proof in a warm place (like oven with light on) for ca. 6 hours. Repeat procedure with next two steps (chef and levain). Refrigerate overnight.

DAY 2:
Remove levain from refrigerator 2 hours before using.

 Cut levain in small pieces (to make mixing easier). Place all ingredients in mixing bowl. Mix on low speed until dough comes together, 1 - 2 minutes. Knead on medium low speed for 4 minutes (dough should be very tacky, bordering on sticky). Let dough rest for 5 minutes, then resume kneading for 1 minute more (dough should be still very tacky, if not sticky).

Place dough in lightly oiled bowl, cover, and let rest in a warm place for 90 minutes. Transfer to lightly floured work surface, and, (with your hands from from the middle of the dough to the sides), push out air, then stretch and fold. Place folded dough with seam down back in bowl. Let rest for another 80 minutes.

Push out air again, let dough relax for 10 minutes more.

Divide into 2 equal pieces, shape into boules, place seam-side down on parchment lined baking sheet, mist with water and sprinkle with rolled wheat. Mist breads with oil spray, cover, and proof for 75 - 90 minutes in warm place, until grown to 1 1/2 times their original size. (Preheat oven after 30 minutes.)

Preheat oven to 250ºC/485ºF, including steam pan.

Place breads in oven, steaming with 1 cup of boiling water, and bake for 5 minutes, then reduce heat to 200ºC/400ºF and bake for 15 minutes. Rotate breads 180 degrees, remove steam pan and continue baking for another 20 minutes (internal temperature 98ºC/209ºF). Leave for 10 minutes in switched-off oven with door slightly ajar. Then cool on wire rack.

A pleasantly nutty tasting bread