Showing posts with label Rolled Oats. Show all posts

Friday, October 5, 2012

HONEY OATMEAL BREAD - BEES WOULD LOVE IT

Hier geht's zur deutschen Version dieses Posts (folgt noch)
It's already October, and still warm and nice. The cats are mostly outside, and Ruffi The Ruffian, our big red tom cat, comes in only when he pleases - he is the only one who can't be bribed by food. 

Roamin' Ruffi, for once at home, resting in his favorite place

My thoughts are already on my upcoming trip to Hamburg, to see my family and friends, and my desk is covered with even more papers than usual: it's high time for the taxes, and I'm procrastinating.

The A(vid) B(akers) C(hallenge) for October was another welcome distraction. We are baking our way through Abby Dodge's "The Weekend Baker", and this month's recipe is "Honey Oatmeal Bread".

  Following Abby's do-ahead option of mixing the dough the day before, then letting it slowly rise overnight in the fridge, was a no-brainer - I do this with almost all of my breads.
You do most of the work the day before, the dough rises while you are sleeping, and, as additional benefit, the taste improves if you give it more time to develop.

I had read about some other bloggers problems with the bread getting too dark in the oven, and there is nothing wrong with your ovens or your baking abilities. The given temperature, 375º F, is simply too high!

According to master baker Peter Reinhart, rich breads with milk, eggs, fat and sugar are best baked at 350ºF, and that works just fine!

Looking at the list of ingredients I stumbled over the staggering amount of sweetener. Okay, this is supposed to be a HONEY oatmeal bread, but 1/3 cup? 

Though I adapted somewhat to Americans' Love of Sweet during my eleven years as a Mainer - I now can eat pancakes with syrup - my stubbornly German stomach still revolts against a really sweet bread.

A bread is a bread - and not a cake! I want to eat it with ham, cheese or salami. And if I want it sweet, I put honey (or jam) on it, not in it. I reduced the amount of honey by half.

From my experience I know that you can safely reduce the amount of yeast in many recipes (even in Peter Reinhart's), especially if you let your dough rise slowly in the cold. 2 1/4 teaspoon/7 g instant yeast are not necessary, 1 1/2 teaspoons/5 g are enough, even for a rich bread like this.

Instead of long kneading I prefer the elegant stretch and fold technique. Even very sticky doughs can be handled - and tamed - with ease, and develop beautifully.

And, instead of brushing the baked bread with melted butter, I applied an egg wash - with more rolled oats as topping.


HONEY OATMEAL BREAD  (adapted from Abby Dodge: "The Weekend Baker")

1 1/4 cups/300 ml whole or 2% milk
             2 oz/57 g old-fashioned rolled oats (not instant)
          3 tbsp/43 g unsalted butter 
        1 1/2 tsp/5 g instant yeast
        2.12 oz/50 g honey
        1 1/2 tsp/7 g salt
   12 1/4 oz/347 g all-purpose flour 
1 egg, lightly beaten with 1 tbsp. water, for egg wash
         rolled oats, for topping
       
DAY 1
Place measuring cup with milk in the microwave and bring to a boil. Stir in oats and butter, and let sit for 20 minutes, stirring once or twice. Stir in instant yeast and honey, until well combined.

Add milk mixture to flour and salt in mixing bowl. Stir on low speed for 1 - 2 minutes (or with wooden spoon) until all flour is hydrated and shaggy mass forms. Let dough rest for 5 minutes.

Knead at medium-low speed for 6 minutes (or by hand). Dough will be a bit sticky, but don't add any more flour (always err on the wet side!)

Transfer dough to lightly oiled work surface. Pat in a rough rectangle. With wet or oiled hands, stretch and fold dough in thirds, like a business letter.

Fold the upper third down...
....then the bottom third up, like a business letter
Then repeat the same stretching and folding in thirds from both sides:

Folding the left side to the right...
....then the right side over to the left
Gather dough into a ball, tucking the sides underneath, and place it, smooth side up, into a greased bowl. Cover, and let rest for 10 minutes. Repeat these stretches and folds (S & F) 3 more times, at 10 minute intervals.

After each S & F the dough will be smoother
After the last S & F, place dough in an oiled container with lid, and place in refrigerator overnight.

DAY 2
Remove dough from fridge 2 hours before using, to warm up. Lightly grease 8 1/2" x 4 1/2" loaf pan.

Transfer dough on clean work surface. Placing your hands in the middle, gently press down to degas. Pat dough into a 7 x 10-inch rectangle. Roll up into a sandwich loaf, pinching seams to seal. Place, seam side down, in prepared loaf pan, then gently flatten with your hands to even it out.

Brush top with egg wash.  Using sharp knife, slash lengthwise. Sprinkle with rolled oats, then gently press with your hands to make sure they stick to the dough.

Preheat oven to 425ºF/220ºC, adjusting rack to middle position. (Steaming is not necessary.)

Glazed with egg wash, slashed and sprinkled with oats
Mist loaf with baking spray, cover, and proof for 45 minutes, or until grown 1 1/2 times its original size. (Poke dough gently with your finger - the dent should slowly come back a little bit, and stay visible, but not fill up again!)

Refresh the scoring if you want the slash to open wider during the bake - I do.

Ready for the oven

Place bread in the middle of the oven, reduce temperature to 350ºF/175ºC, and bake for 20 minutes. Rotate loaf 180 degrees for even browning, and continue baking for another 20 - 25 minutes, until top is golden brown, and it registers at least 195ºF/90ºC.

Remove from oven, turn out onto wire rack, and let cool.

We had the lovely looking loaf, toasted, for lunch. It was still mildly sweet, but its taste blended harmoniously with Black Forest ham, as well as with my Rose Hip Jam.


Next time I bake it, I'll substitute 10% of the white flour with spelt or whole wheat, to add a little more heartiness.

And if you would like to join us, go to Hanaâ's Kitchen, and check out what comes next.

Monday, August 13, 2012

DAN LEPARD'S ALEHOUSE ROLLS


Hier geht's zur deutschen Version dieses Posts


When I was a student, I traveled with my best friend, Andrea, through England, Cornwall and Wales. We didn't have a fixed itinerary, we just followed our nose to places we had read or heard about.

We didn't stay in hotels (only once, and that was as dusty as it was expensive), we preferred B&Bs, always looking for interesting old buildings. We slept in grand manor houses, rustic inns, cozy farm houses, and even a water mill from the sixteenth century.

Old Water Mill Inn & Pub, England 1971
People always complain about the English food - I never had a really bad experience, I would always find something I liked, as long as it started with "apple" and ended with "pie"!

We often ate in pubs, having sandwiches with cheddar and chutney, and I was delighted to try the different beers.

With all these fond memories in mind - no wonder I wanted to try master baker Dan Lepard's Alehouse Rolls. You will find it in his book "Short and Sweet", or here.

I had just bought Newcastle Brown Ale at the Bangor commissary, and thought this was very appropriate for British rolls.

The dough is made with a hot beer soaker - ale and oats are brought to a boil, with butter and honey added to the hot liquid - and the rolled oats are toasted.

It also has some whole grain flour, to make the rolls even heartier (and give health conscious bakers a better conscience!)

Hot soaker with ale, oats, butter and hone
Dan Lepard has a nice, minimalistic approach to working the dough, he handles it gently, kneads it very briefly, and allows it to develop while resting (autolyse).

As a psychotherapist this method appeals to me a lot: give the patient dough the means and time to develop, without pushing and hectoring - and it will grow just fine!

At different times I had to add varying amounts of water to the final dough, the consistency should be soft and somewhat sticky.

Instead of letting the dough rest for a final 30 minutes on the counter, I did what I usually do - and put it to sleep overnight in the fridge.

This cold fermentation of the dough fits much better in my schedule than doing it all on one day. Though I like baking in the morning, I don't want to get up in the wee hours, so I prepare everything the day before, and only have the shaping and baking left to do.

Having to choose between large sandwich rolls (à 235 g a piece) or smaller dinner rolls, I opted for the more petite version - 12 rolls à 92 g.

The recipe suggests rolling the rolls first over wet kitchen paper towels and then in oat flakes. I didn't read the instructions thoroughly, and, therefore, dunked only the tops in the oat meal.

Alehouse Rolls - ready for baking

Whereas the giant sandwich rolls have to bake for 20 minutes at 210º C/410º F, and then some more at reduced heat, my little rolls were golden brown after 26 minutes (without reducing the heat.)

They tasted just as good as they looked, a semi-soft crust with a little crunch, and a hearty, somewhat nutty flavor.

I have made these rolls with rye flour and brown ale, whole wheat and stout, as well as spelt flour and a rather hoppy ale. All versions tasted excellent, spicy and slightly sweetish.


ALEHOUSE ROLLS  (adapted from Dan Lepard)
(12 Rolls)

75 g rolled oats
440 ml ale or stout
25 g butter
25 g honey
450 g bread flour
100 g rye, whole wheat, or spelt flour
6 g instant yeast
8 g salt
20 g cold water, or more, as needed (I used up to 80 g)
rolled oats, for topping

DAY 1
Toast oats in oven at 400ºF/200ºC for ca. 7-10 minutes, stirring in between, until they turn a rich golden brown (or toast them in a dry skillet on the stove top.)

In a saucepan, bring beer and toasted oats to a boil over medium heat. Remove pan from the heat, add butter and honey, stir until melted, cover, and let cool for ca. 30 minutes.

Mix flours, yeast and salt together in large bowl. Add lukewarm oat mixture and stir with your fingers, adding a little cold water if needed to make a soft, somewhat sticky dough (hand mixing gives you a better feeling for how much extra water you should add). Cover bowl and leave for 10 minutes.

Transfer dough to lightly oiled work surface, and, with oiled hands, gently knead it for 10 seconds. Scoop dough back into bowl, cover, then repeat the light knead 2 x more at 10-minute intervals. Place dough in oiled container, cover and refrigerate it overnight. (At this point I divide the dough into 2 portions).

Alehouse Roll dough after bulk rise - ready to be shaped


DAY 2
Transfer dough to lightly floured work surface. Divide it into 12 pieces. Shape into rolls.

Place sheet of wet paper kitchen towel on one dinner plate, and rolled oats on another, then roll each roll first across wet paper and then through oats. Place on parchment lined or perforated baking sheet, cover, and let rise for 45 - 60 minutes, or until they have grown by 1 1/2 times their original size.

Preheat oven to 210°C/410°F. (Steam optional.)

Bake the rolls for 12 minutes, rotate, (remove steam pan if using) and continue baking for another 13 minutes, until golden brown.

Post updated 9/6/14 to include formula and BreadStorm downloadable file.


As tasty as they look - freshly baked Alehouse Rolls.

Sunday, June 3, 2012

MUESLI ROLLS

Muesli Rolls
 Hier geht's zur deutschen Version dieses Posts


A while ago I admitted neglecting some of my baking books, never giving them a second look, while shamelessly favoring others.

To atone for my neglect, I pledged to give every book a fair chance with my "Equal Opportunity Baking" list, with one recipe from ALL of my baking books.

Published in 1997, I use "Brot und Kleingebäck" mainly as resource, adapting the old, labor intensive methods to more modern techniques that require less brawn and hands-on work, thanks to longer fermentation and refrigerator sleepovers.

Interesting recipes but old techniques
These little (or no)-knead methods, described by Peter Reinhart, Jim Lahey, and others, are much easier to work with. And not only that, they also improve the taste.

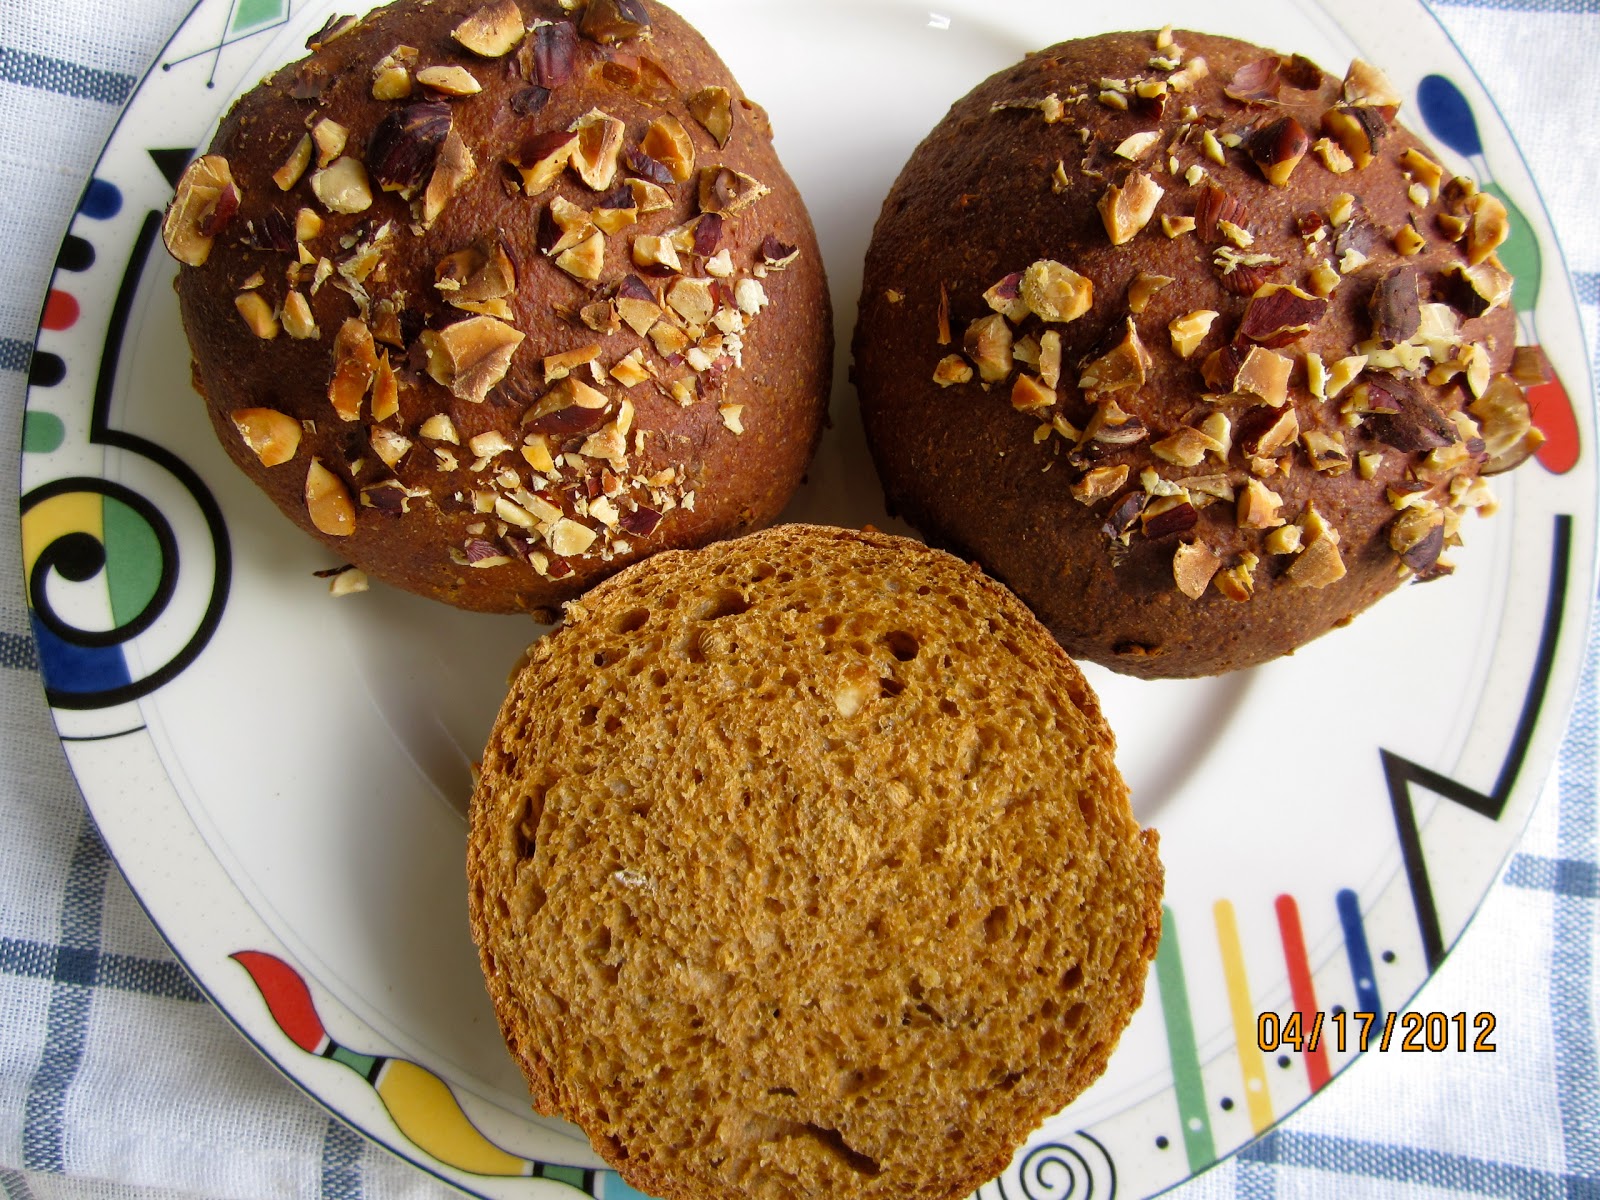
I started the evening before, kneading the dough, then let it slowly rise overnight in the fridge. The next morning I baked my rolls. When they came out of the oven, they looked - and smelled - very appetizing.

I couldn't wait to have my first bite, but what a disappointment - I found that "the proof was in the Muesli Rolls". They tasted good, yes, but were much too dry!

How could that happen? My dough had been well hydrated the night before, even a little bit sticky, as it should be with stretch-and-fold doughs.

I really liked the taste of the rolls, otherwise I would have written off the recipe with a scribbled comment: "not that great!" Therefore, I took on the recipe again to find out what had caused this lack of moisture.

Was it the different fat content of German "saure Sahne" and American sour cream (10% vs 12-16%?) Not likely: more fat will make the crumb softer, but not drier.

Saure Sahne or sour cream - here it didn't matter
American molasses instead of German sugar beet syrup? Nope! And my baking friend Paul only recommend adding more water, when I asked for his advice.

But there was one ingredient that had puzzled me from the beginning - the unspecified "hearty muesli mix". There are many muesli mixes on the market, and they differ in their composition from one brand to the other.

I looked at the list of ingredients on the package. Bob's Red Mill's "Old Country Style Muesli" had 5 different flakes, dates, raisins, flax seed, sunflower seeds, almonds, and walnuts.

The stretch-and-fold method doesn't require pre-doughs (except for sourdough breads, of course). Usually the whole grains and seeds have enough time to soak when they spend the night in the fridge.

But I find that pre-soaking coarser ingredients doesn't hurt. And whole flax seed I always soak for 24 hours, anyway - to make them better digestible.

This is the culprit!
Even though my dough seemed well hydrated after the stretch-and-fold procedure, those flakes, seeds and dried fruits had swallowed a lot of water overnight.

The original recipe mentions overnight refrigeration as a do-ahead option, too, but without the muesli mixture. That should be kneaded into the dough before baking.

With just 10 minutes (!) rising time for the shaped rolls, the flakes and dried fruits have no time to absorb much liquid, and the original recipe requires - except for the sour cream - only 5-6 tablespoons water!

But what to do? I like chewing on nuts, yes, but on hard pieces of dried fruit? No, thanks!

In a comment, the recipe suggests using a mixture of oatmeal, raisins and hazelnuts, instead of store bought muesli. And that's exactly what I did when I made the rolls again - to have better control over the hydration.

Since a ready muesli mixture also contains sugar, I added a bit of honey. These whole wheat rolls should be slightly sweet.

I hoped these tweaks would work, and I wasn't disappointed - the second batch of muesli rolls turned out just as nice as they looked!


MUESLI ROLLS  (10 - 12))

Soaker
65 g old fashioned rolled oats
20 g golden raisins
100 g water

Dough:
400 g whole wheat flour
185 g soaker (all)
250 g sour cream or Greek yogurt, lukewarm
12 g instant yeast
45 g/2 tbsp molasses
10 g honey (or more, to taste)
1 large egg
6 g salt
5 crushed coriander seeds
½ tsp ground cinnamon
20 g toasted hazelnuts, coarsely chopped
egg white, mixed with a bit water (for glazing)
20 g hazelnuts, finely chopped (for topping)

The homemade muesli mix worked!

DAY 1:
In the morning, stir together all soaker ingredients. Cover, and leave at room temperature.

In the evening, mix together with all dough ingredients at low speed (or with wooden spoon), until all flour is hydrated, and rough ball forms. Let dough rest for 5 minutes.

Knead at medium-low speed (or with hand) for 2 minutes, adjusting with a little more water, if needed. (Dough should be somewhat sticky.) Resume kneading for another 4 minutes. (Dough should still be a bit sticky.)

Transfer dough to a lightly wet or oiled work surface. With wet or oiled hands, stretch or pat dough into a rough square. Fold like business letter in 3 parts, then repeat the same folds from the left and right side.

Pick up dough ball, gathering edges underneath, and place, seam side down in lightly oiled bowl. Cover, and let rest for 10 minutes. Repeat this stretching and folding 3 times more, at 10 minute intervals. After the last fold, place dough in oiled bowl or container, cover, and refrigerate overnight.

Ready for baking

DAY 2:
Divide cold dough*) into 10 - 12 equal pieces. Shape rolls, or torpedoes, and place them, smooth side up, on parchment lined baking sheet (I like using a perforated baking sheet). Place hazelnut pieces for topping on a plate.

Brush rolls with egg wash, and dip in hazelnuts. Gently press nuts down, so that they stick. Let proof 45 - 60 minutes, or until rolls have grown 1 1/2 times their original size, and a dimple, poked with your finger, doesn't fill up again.

Preheat oven to 400ºF/200ºC. Bake rolls for 12 minutes, rotate 180 degrees, and continue baking for about 13 minutes more, until they are deep golden brown.

Let rolls cool on wire rack.

*)  With rolls it is not necessary to let them come to room temperature before shaping. They warm up fast.


 Submitted to Yeast Spotting

Updated 12/28/13